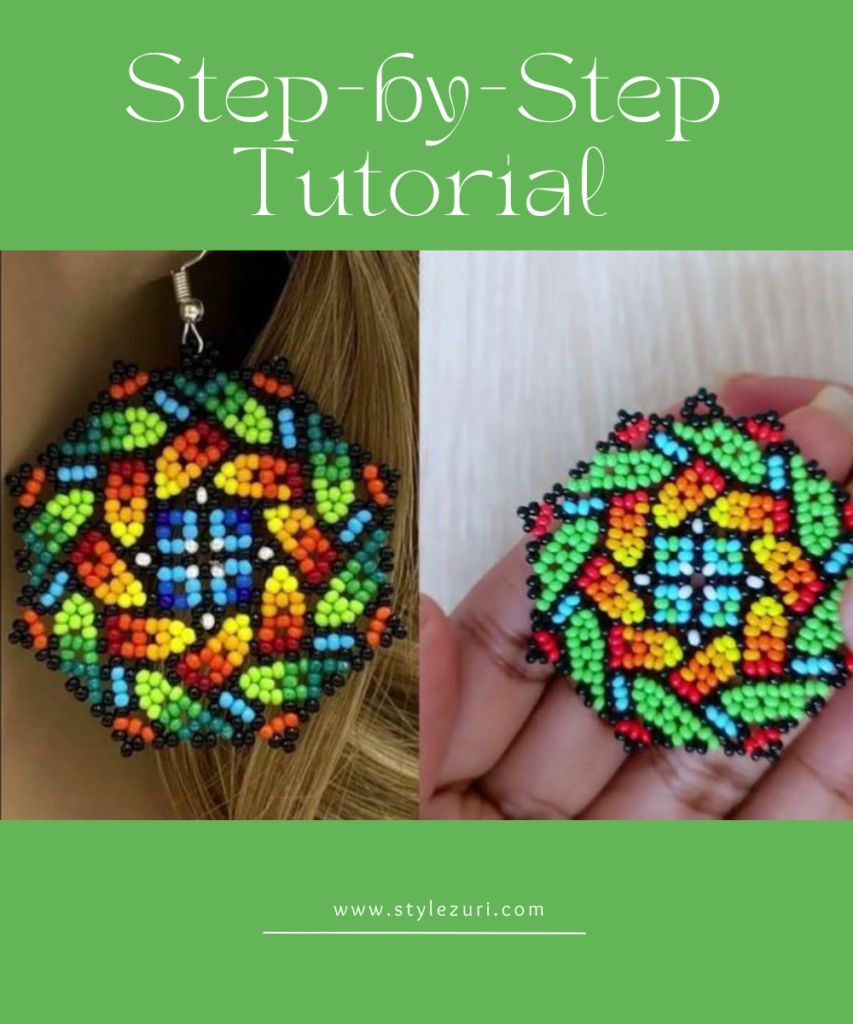
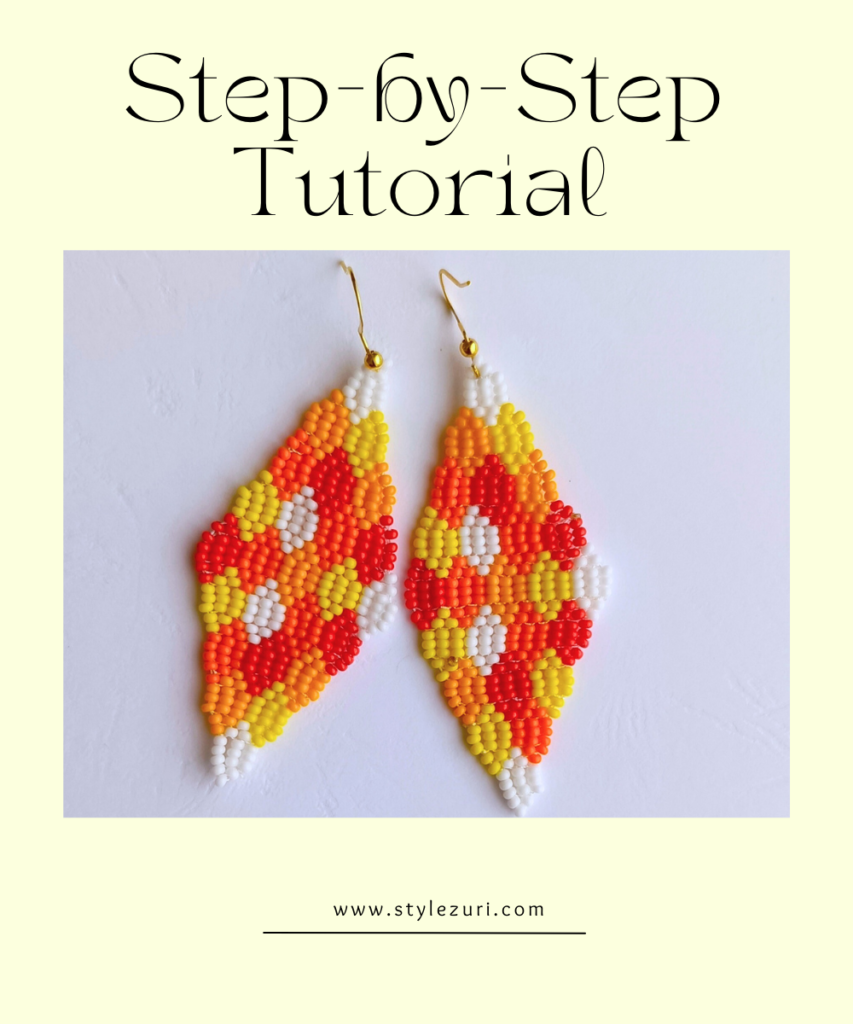
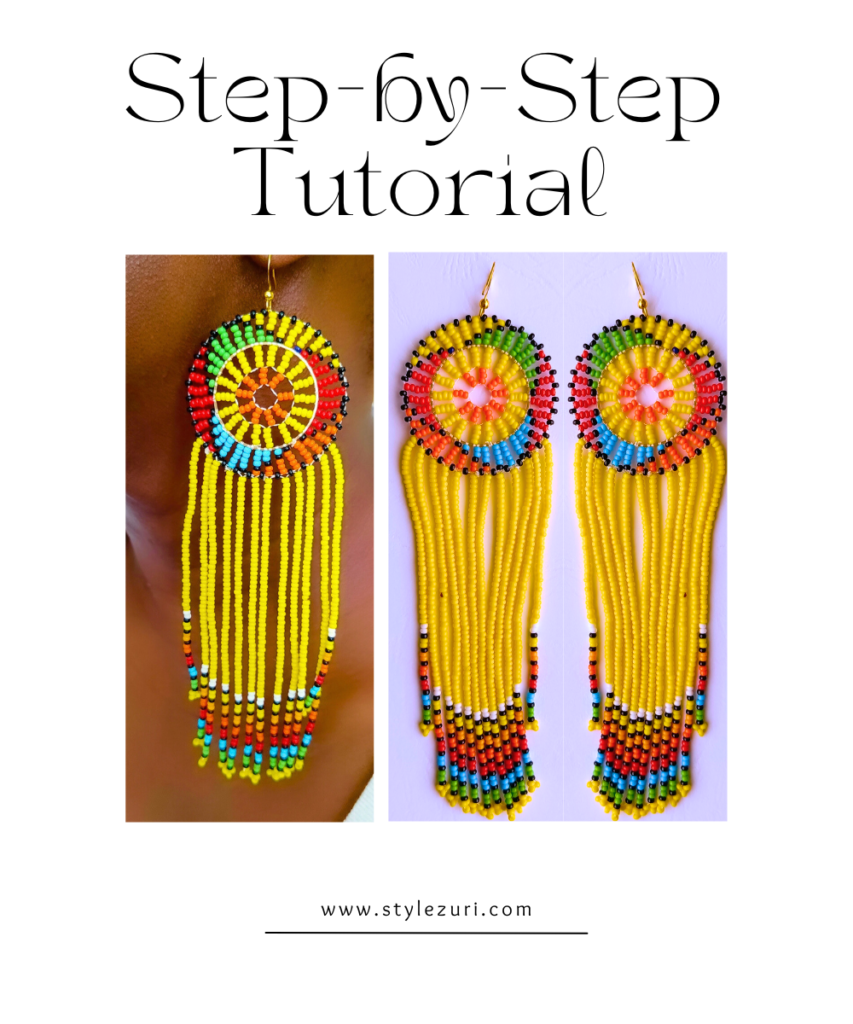
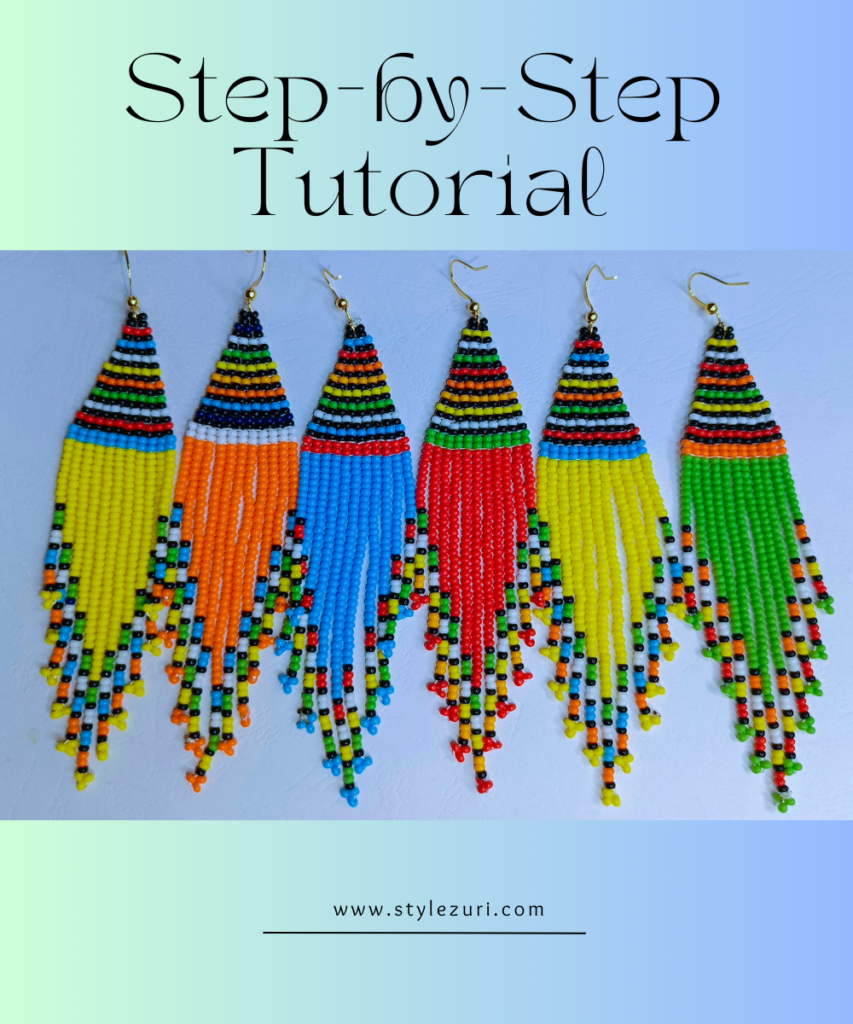
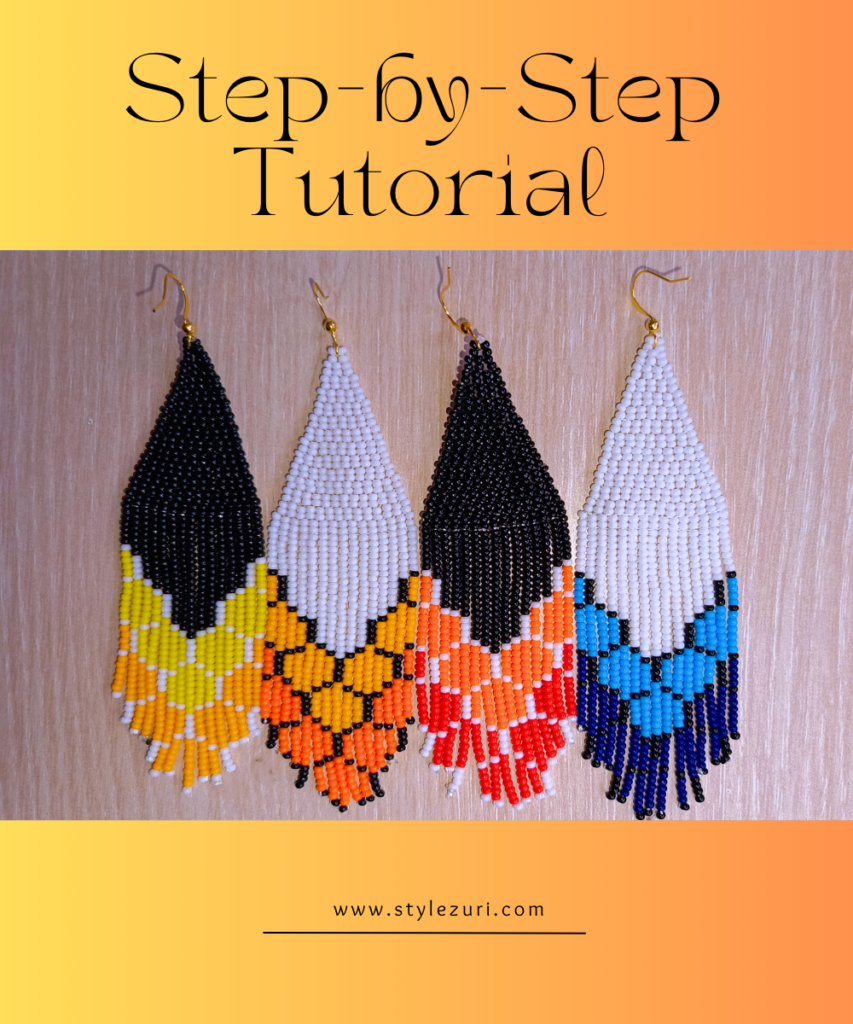
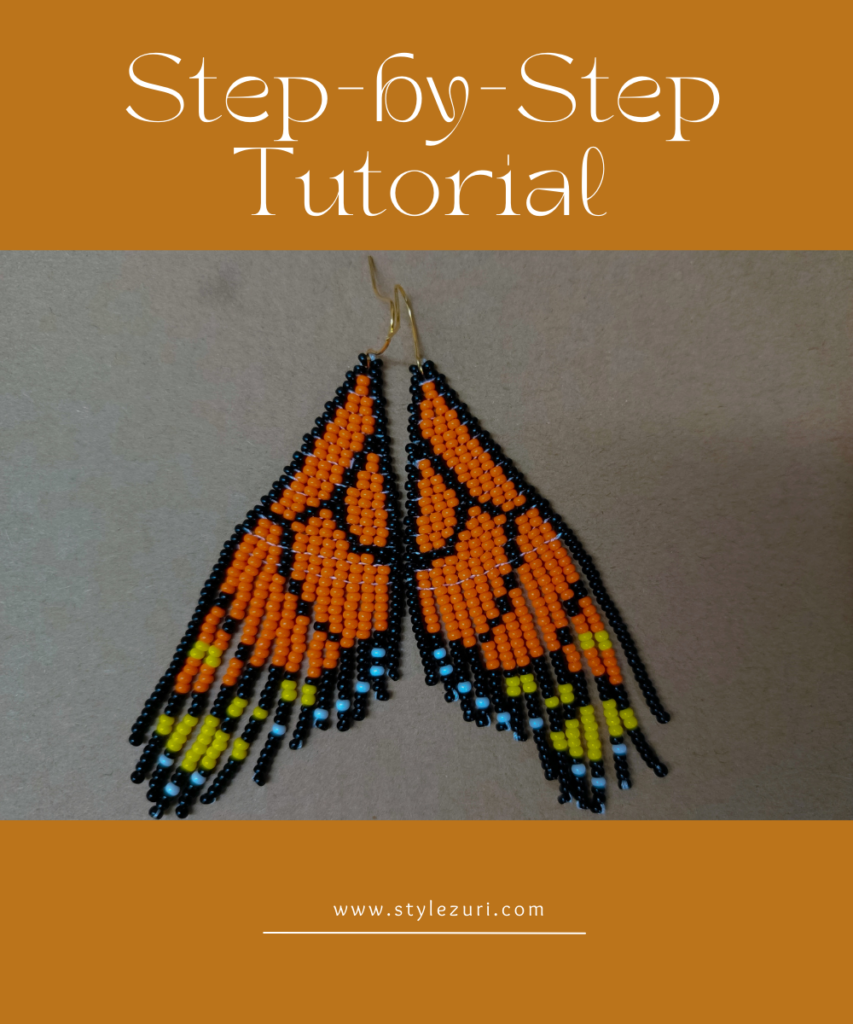
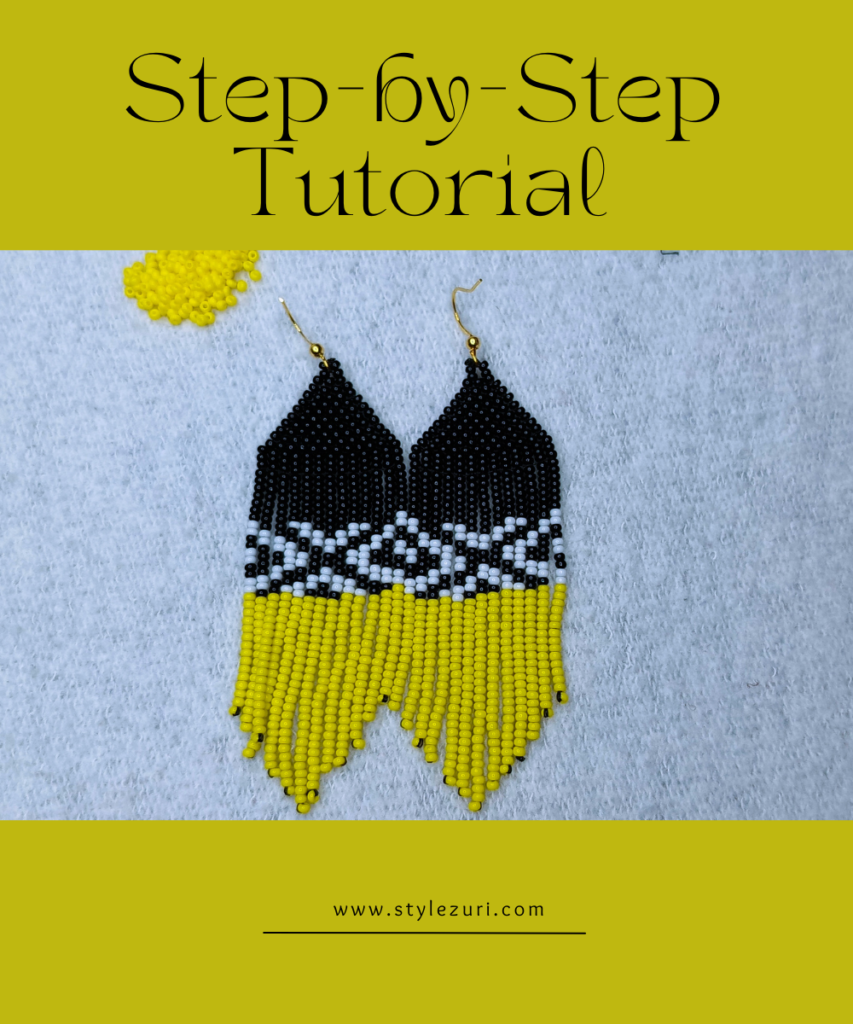
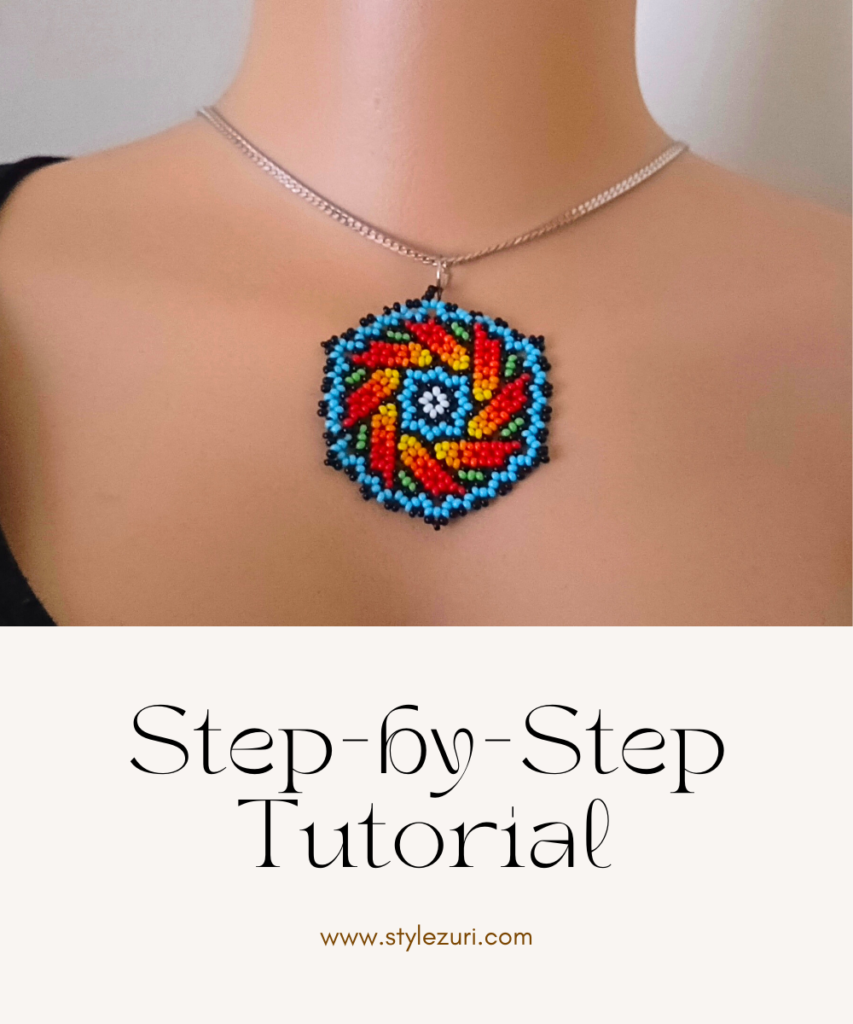
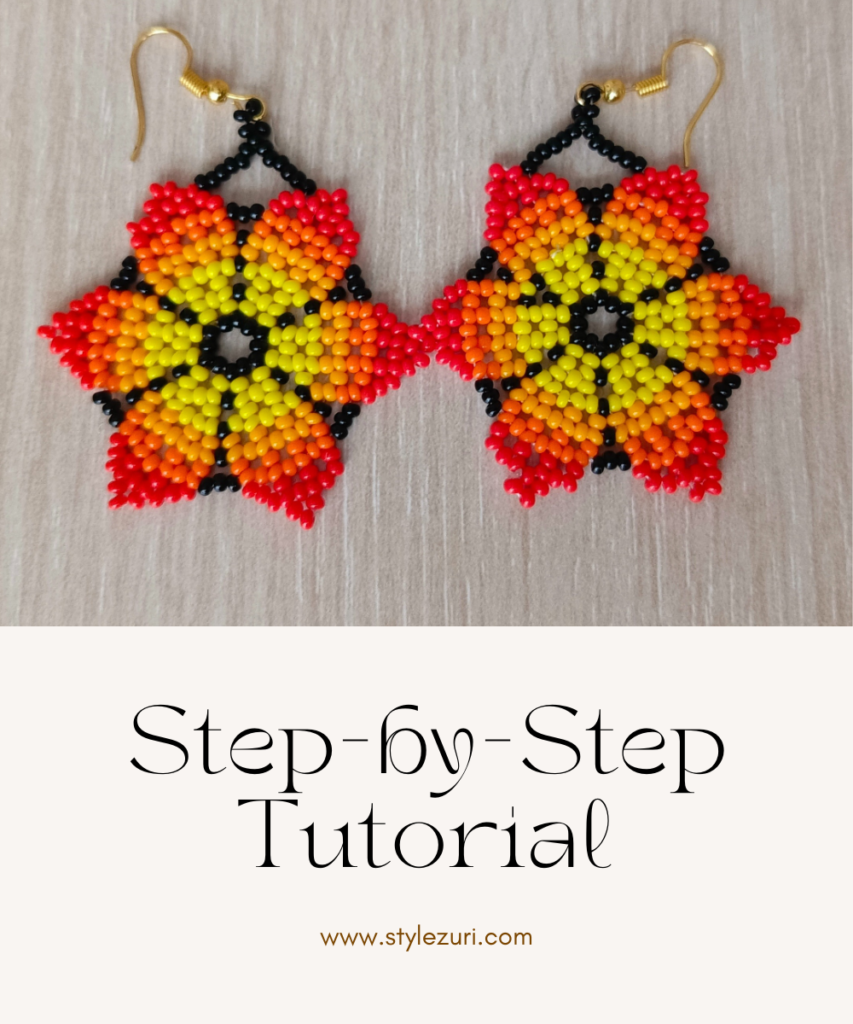
Welcome to this fun and easy Huichol style beaded earring tutorial! Whether you’re a beading newbie or a seasoned pro, this beaded tutorial comes with a free pattern that will spark your creativity. And if you’re more of a visual learner, no worries—I’ve got you covered with a step-by-step YouTube video below. Just press play, and you can watch me work my magic!
Before we get started, make sure you have all your supplies handy. For this design, I used size 10 seed beads in eight vibrant colors: white, black, yellow, blue, orange, yellow-orange, red, and green. But feel free to mix it up with your favorite colors! Ready to create some stunning geometric earrings? Let’s get started!
Table of Contents
STEP 1
Alright, let’s get started! First things first, thread your needle and pick up 8 beads—one black, then one white, alternating until you’ve got all 8 on there. They should be in a white-black pattern. Once you’ve got your beads lined up, tie a double knot to secure them, and then pass your needle through one white bead. Just like it shows in the diagram!
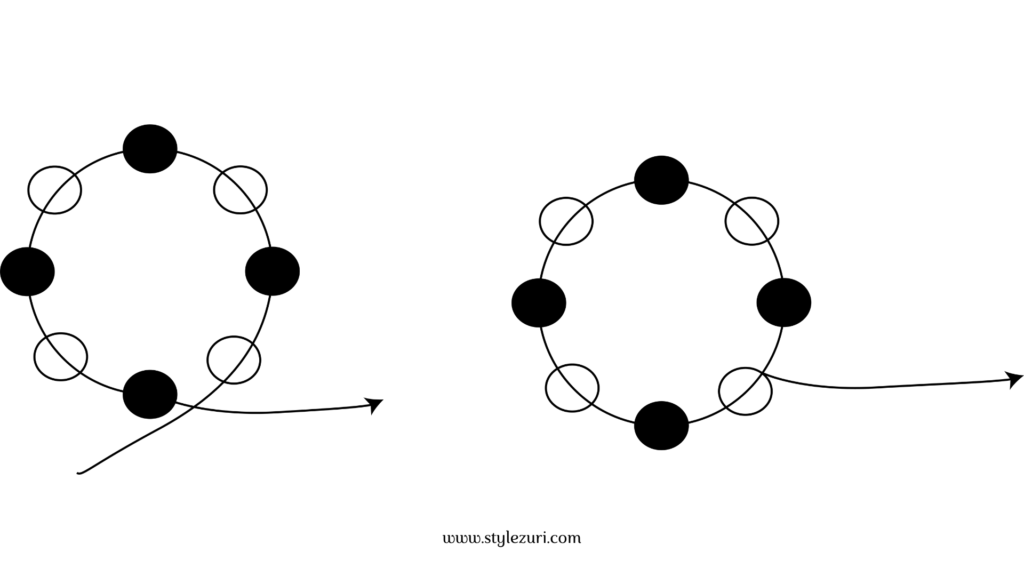
Next up, grab 2 blue beads, 1 black bead, and 2 more blue beads. Now, skip over the black bead in your row and pass the needle through the next bead, which should be the white one. Simple as that!
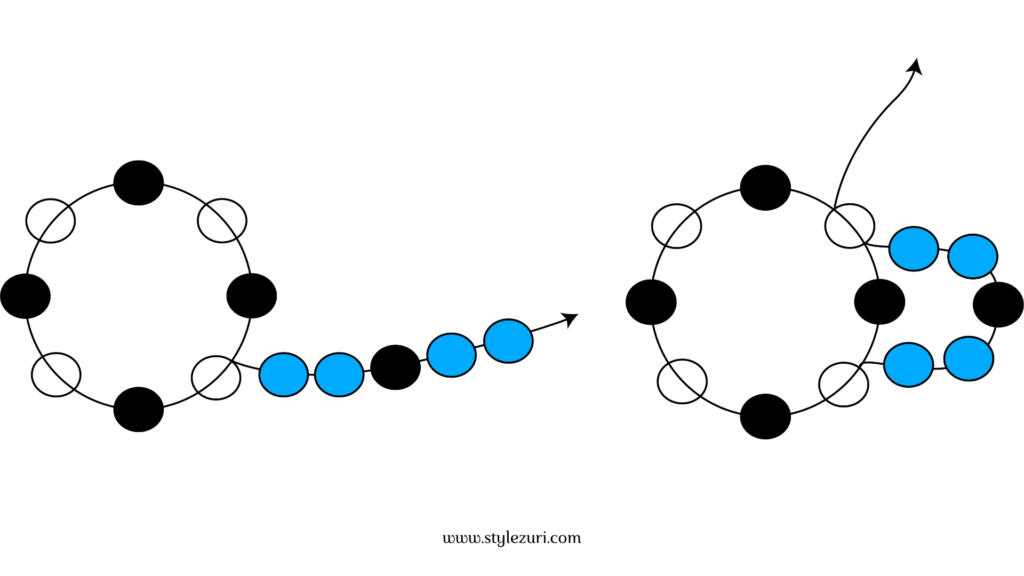
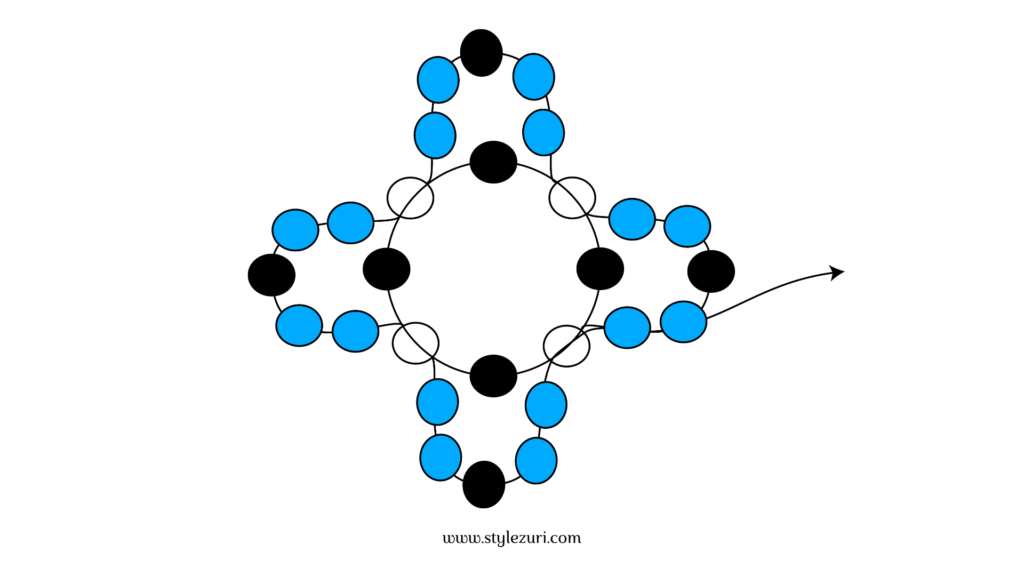
Keep repeating that pattern until you reach the end of the circle. When you get to the end, pass the needle through the first 2 blue beads so we’re all set to start our second step. And that’s it—first step done!
STEP 2
Now onto our second step! Start by picking up one black bead, one white bead, and another black bead. Let’s keep it going!
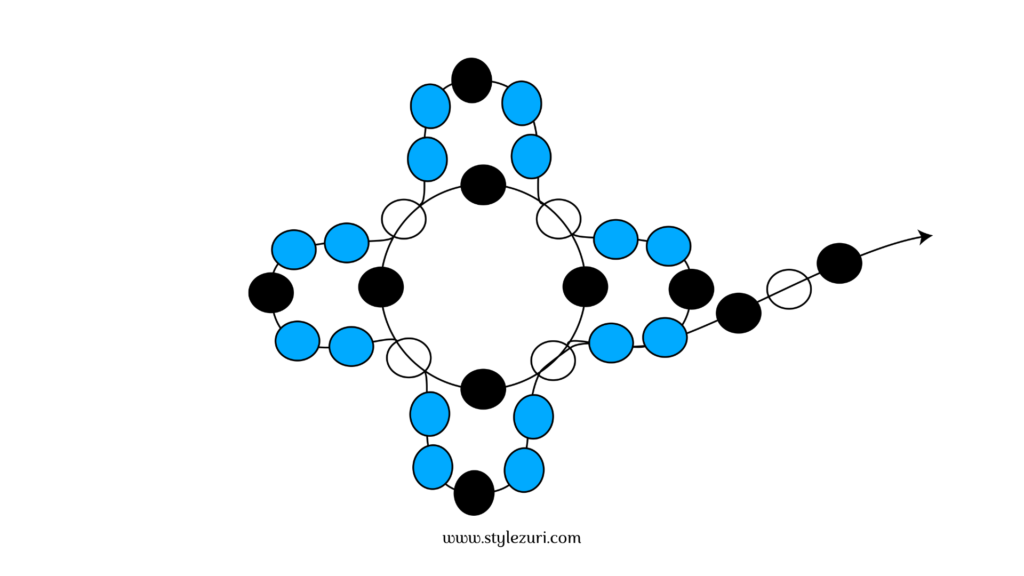
Skip the black bead and pass the needle through the next blue bead.
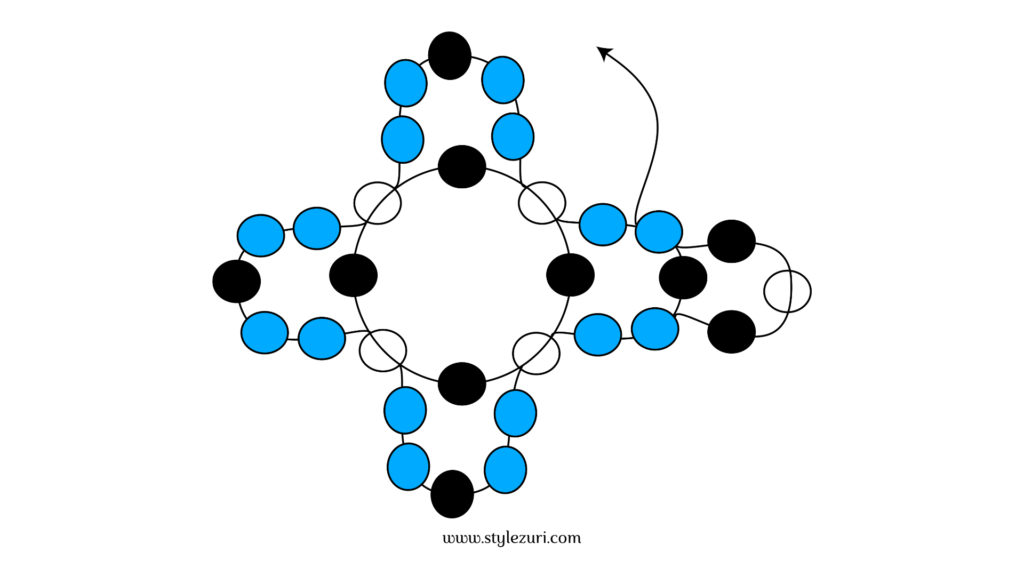
Pick one green bead, one blue bead and one green bead.
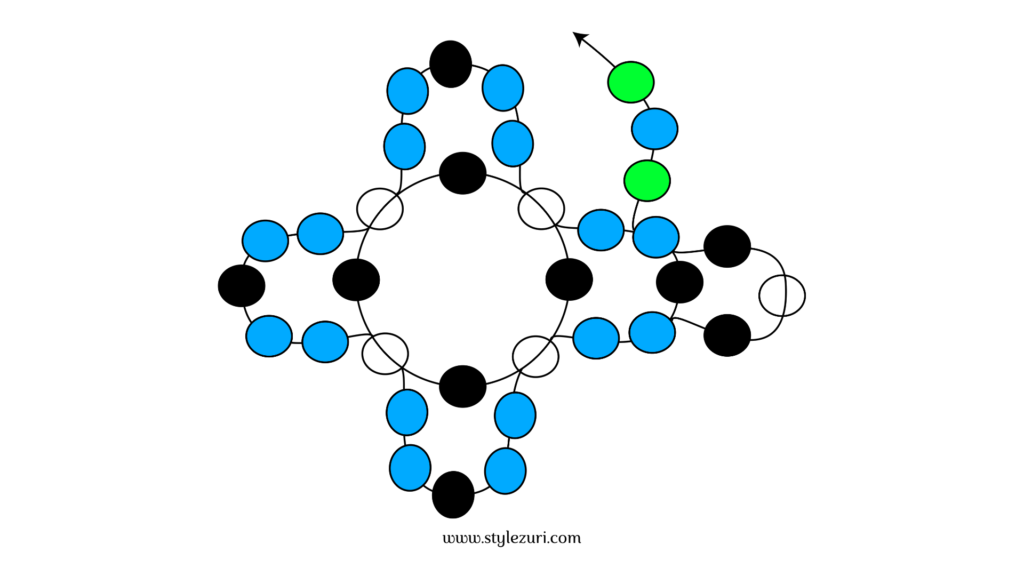
Pass the needle through the second blue bead.
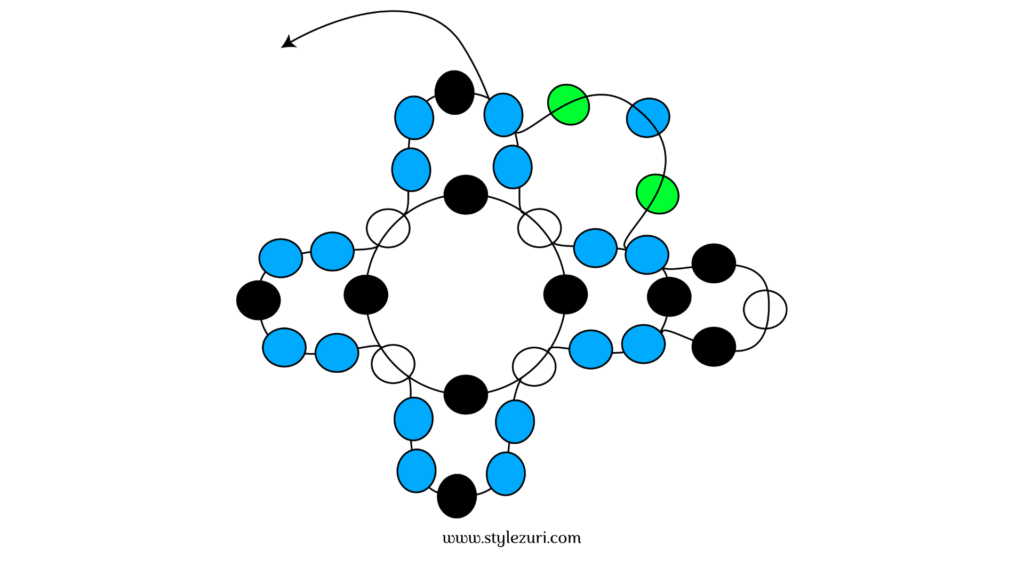
Now the pattern starts over, so just repeat what we’ve done until you reach the end of the second step. When you get there, make sure to pass the needle through the black and white bead so we can kick off our third step. It’s important to start at the white bead, so don’t forget to thread through the black and white bead when you finish up!
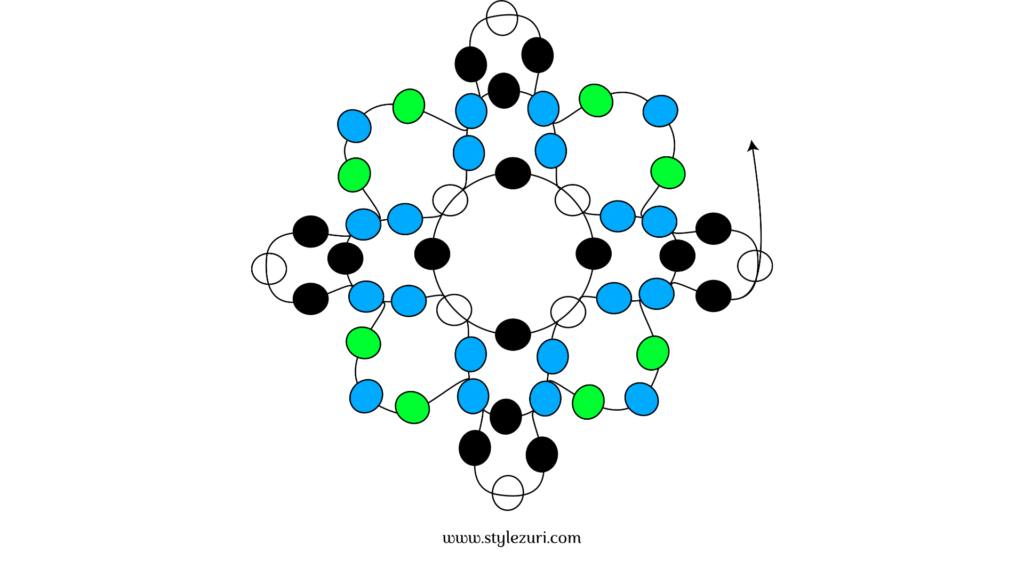
STEP 3
Now onto step 3! Start by picking up 5 beads in this order: one black, one yellow-orange, two yellow, and another black.
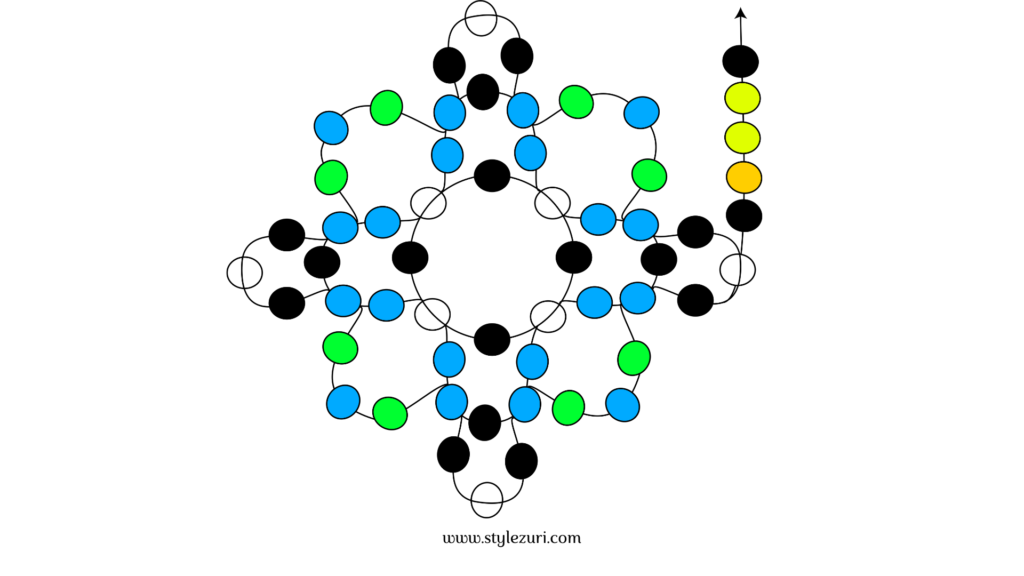
Next, pass the needle through the blue bead, which is the one in the middle between the two green beads.
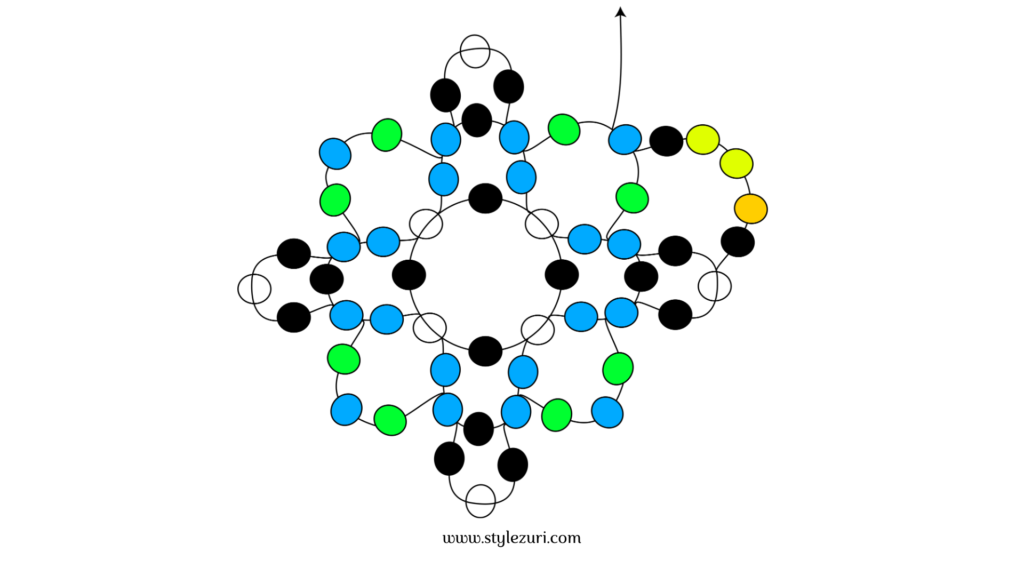
Now pick up 5 beads again, just like we did before: one black, one yellow-orange, two yellow, and one black.
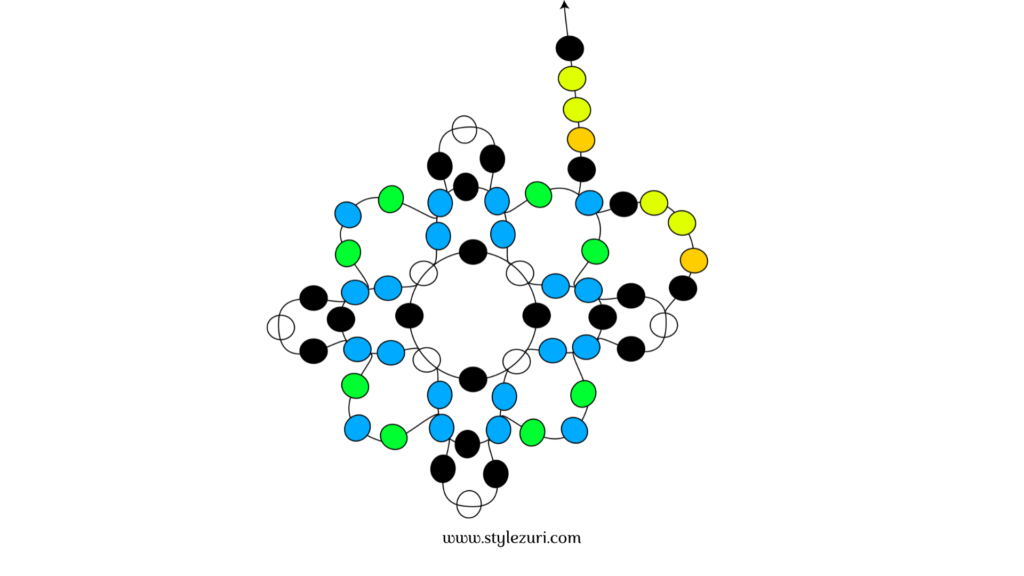
Next, pass the needle through the white bead, which is the one in the middle between the two black beads.
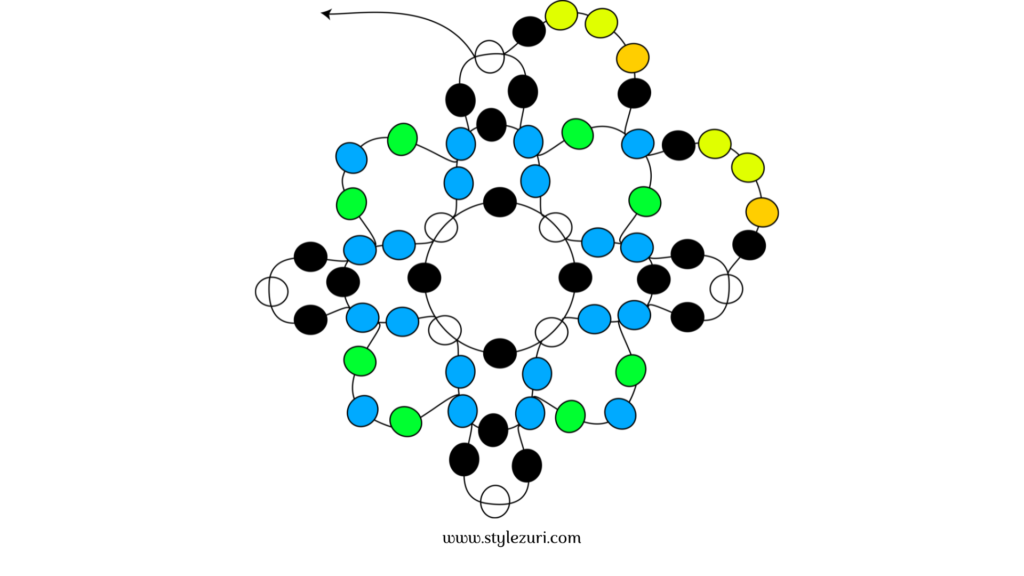
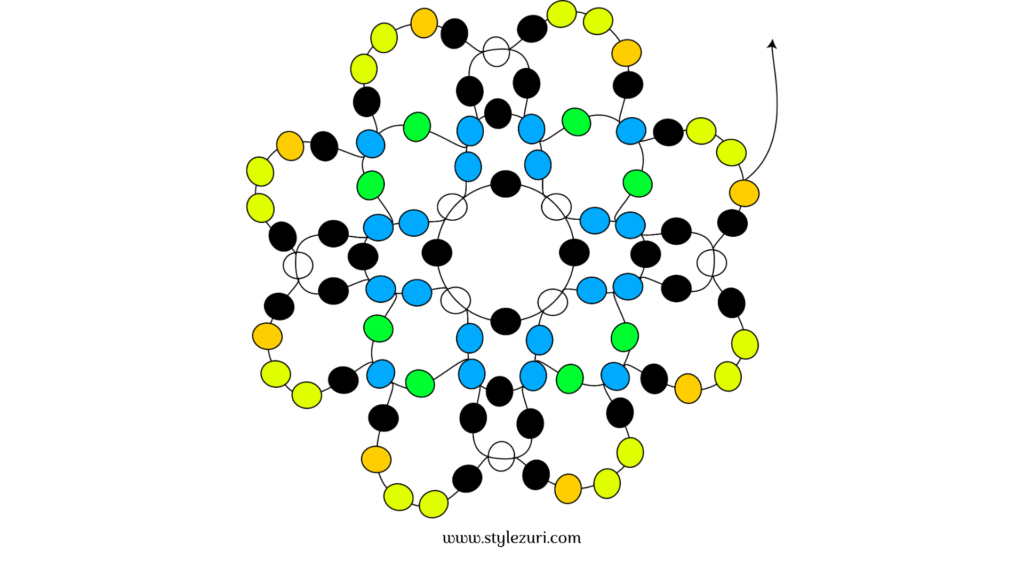
Now the pattern repeats, so just keep going until you reach the end. When you get there, pass the needle through the black bead and the yellow-orange bead. This will get us ready to start the fourth step
STEP 4
Now we’re at step 4! Start by picking up 2 yellow-orange beads and 1 yellow bead
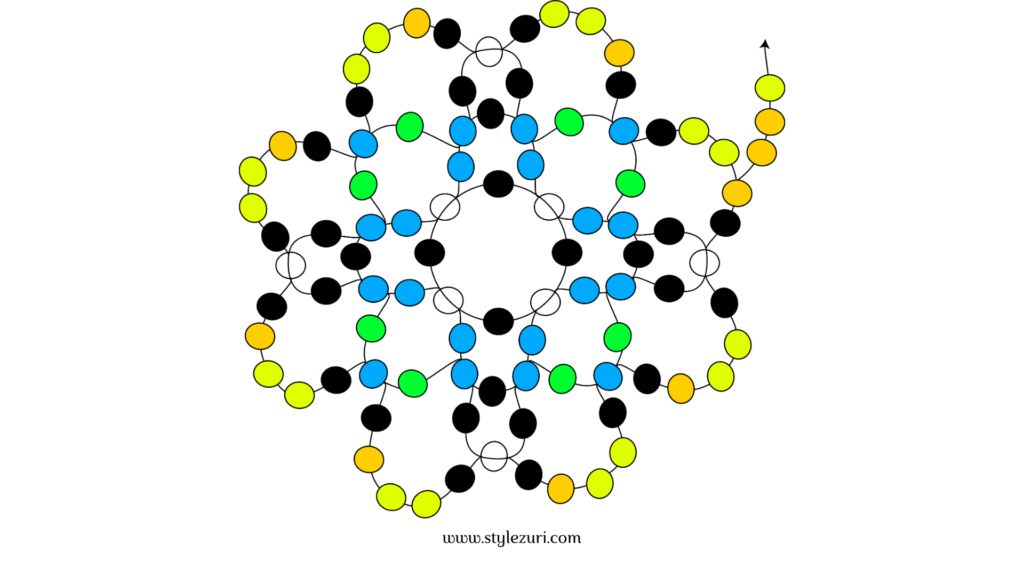
Skip the yellow bead and pass the needle through the next yellow bead.
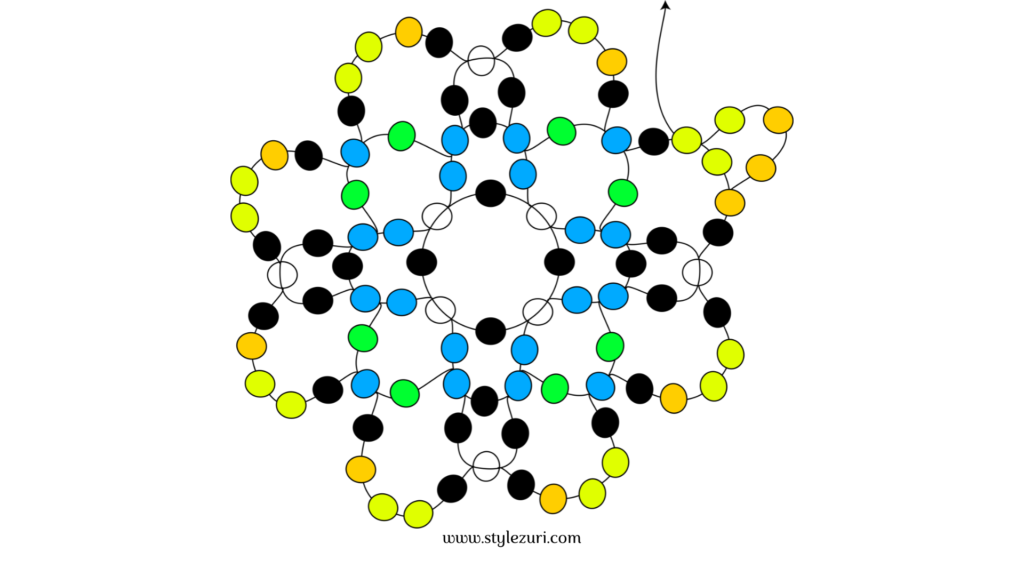
Now pick one black bead, one orange bead and one yellow orange bead.
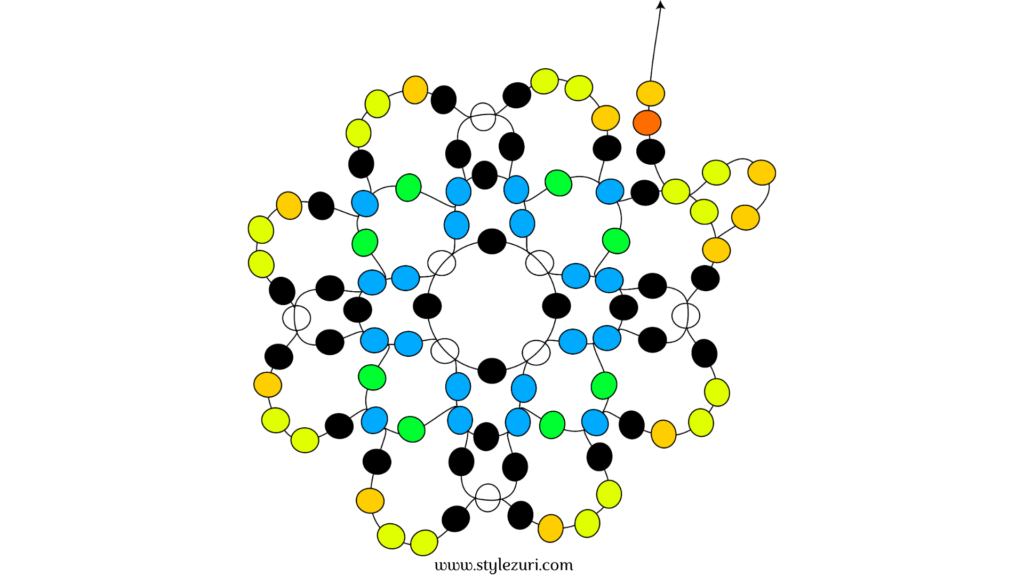
Pass the needle through the second bead which is the yellow-orange bead.
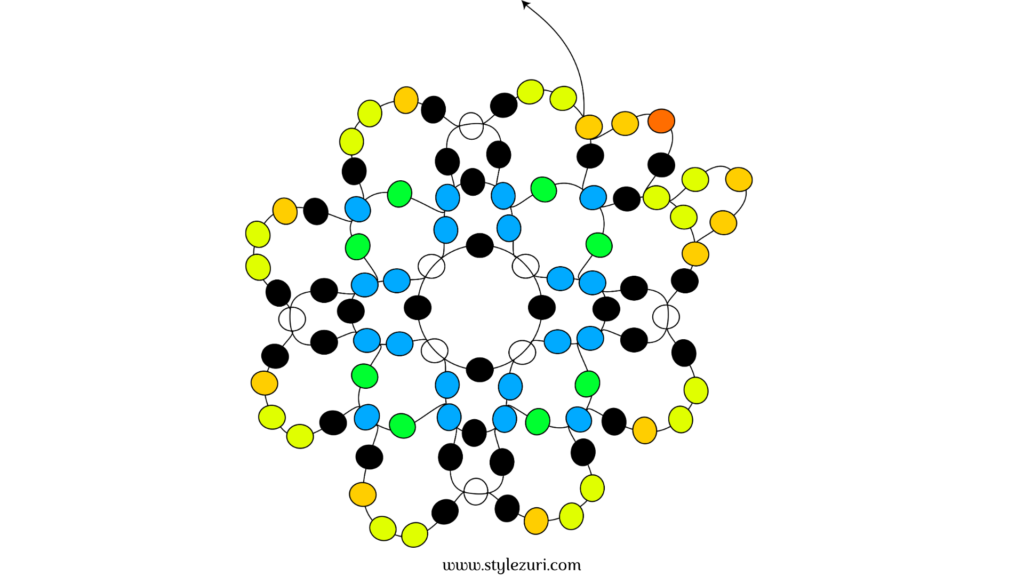
Now the pattern repeats, so just keep going until you reach the end. When you get there, pass the needle through the 2 yellow-orange beads so we can jump into the next step from there.
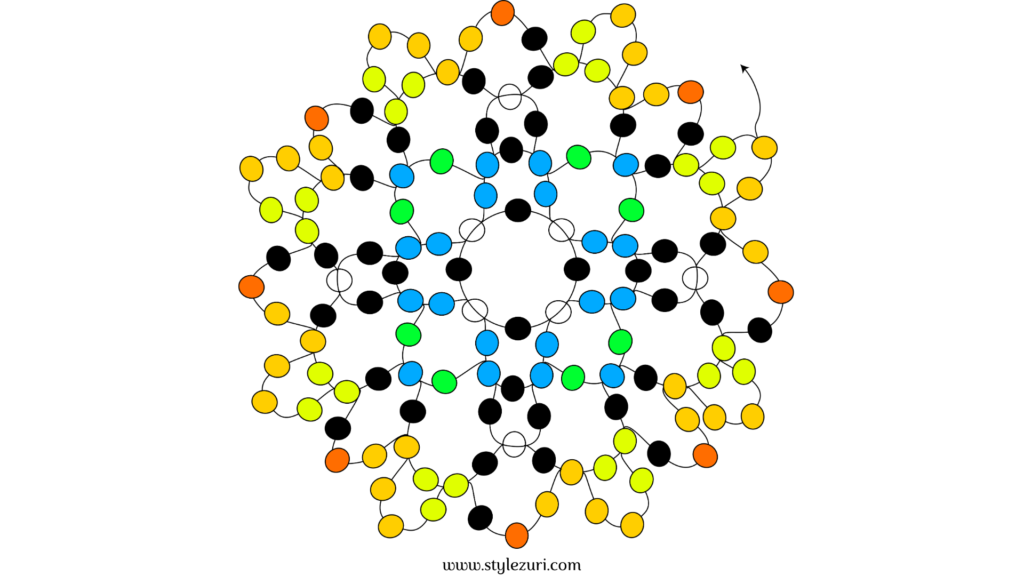
STEP 5
Start step 5 by picking one black bead, one red bead and one yellow orange bead.
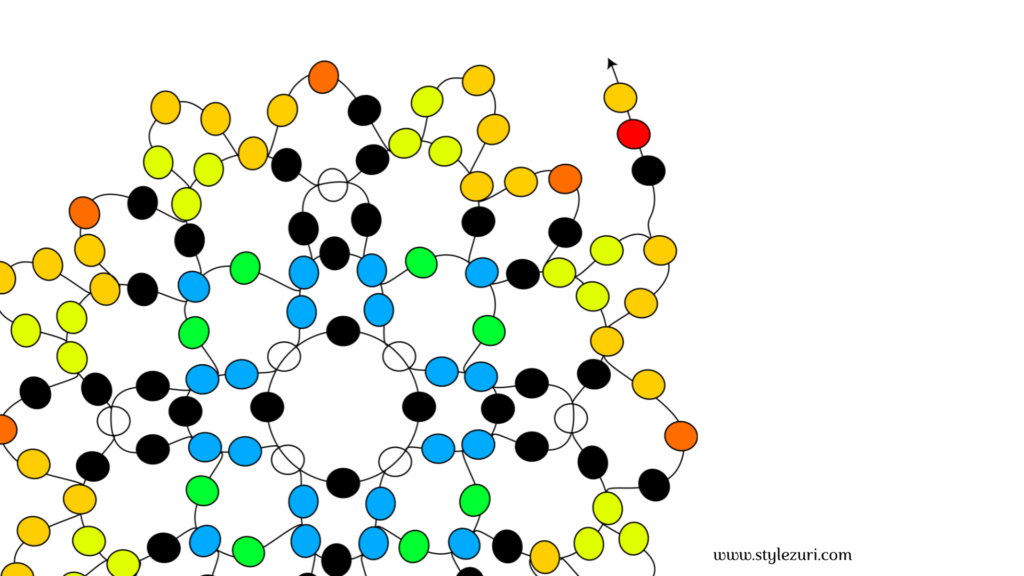
Pass the needle through the middle orange bead.
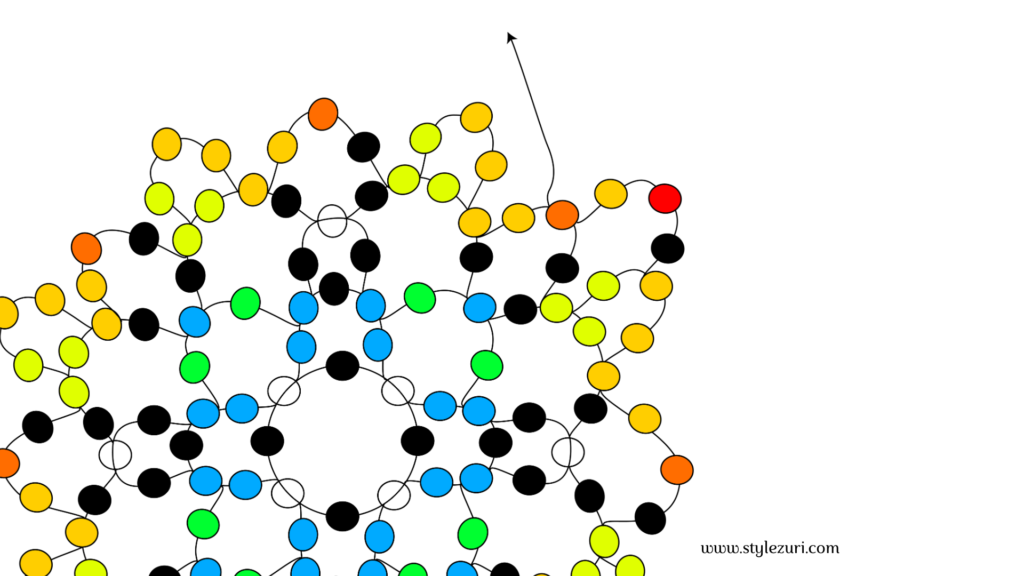
Now pick 2 orange beads and one yellow orange bead.
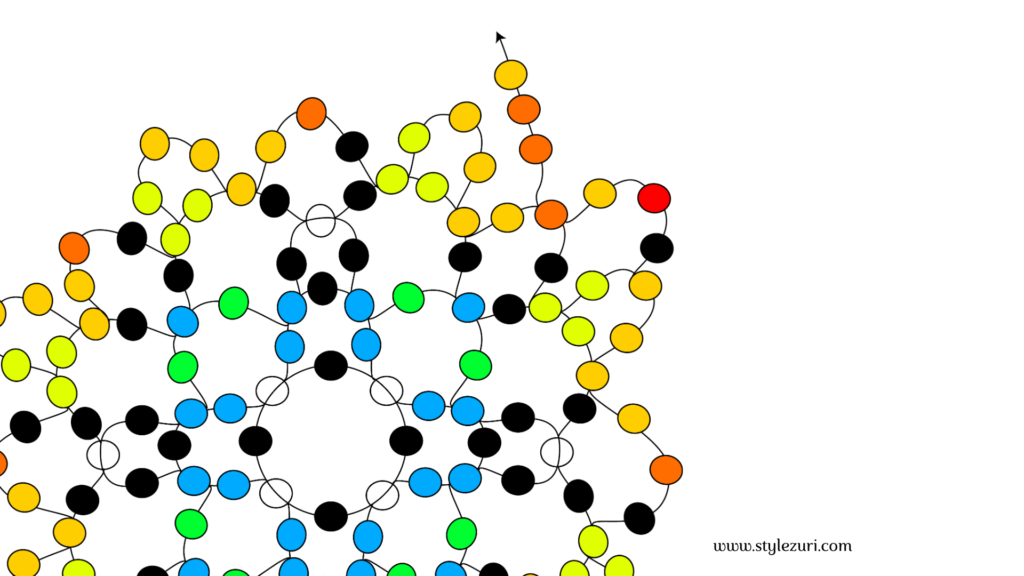
Pass the needle through the middle yellow orange bead.
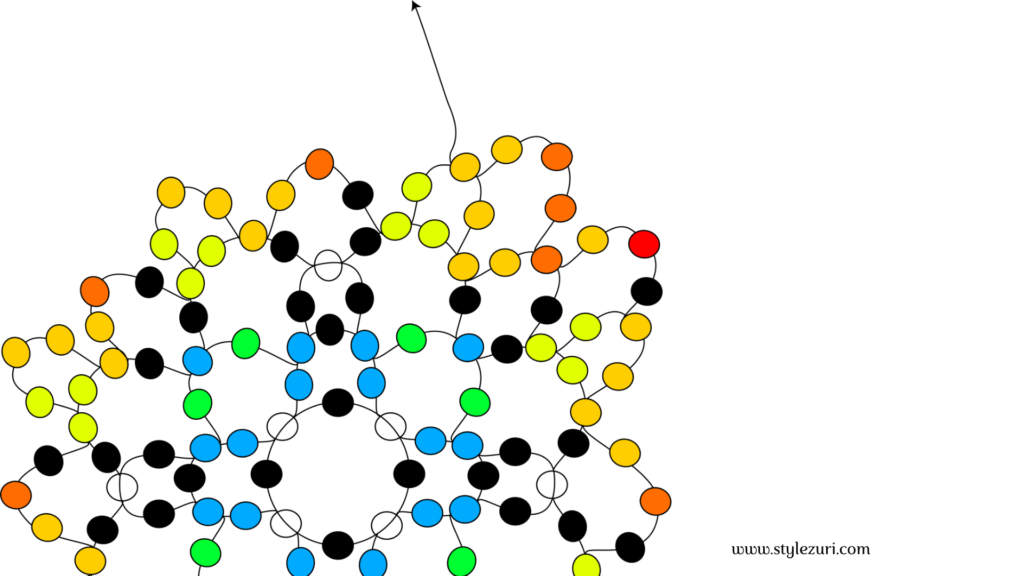
Now the pattern repeats from here, so just keep going until you reach the end. When you get there, pass the needle through the black and red bead so we can start our next step from there.
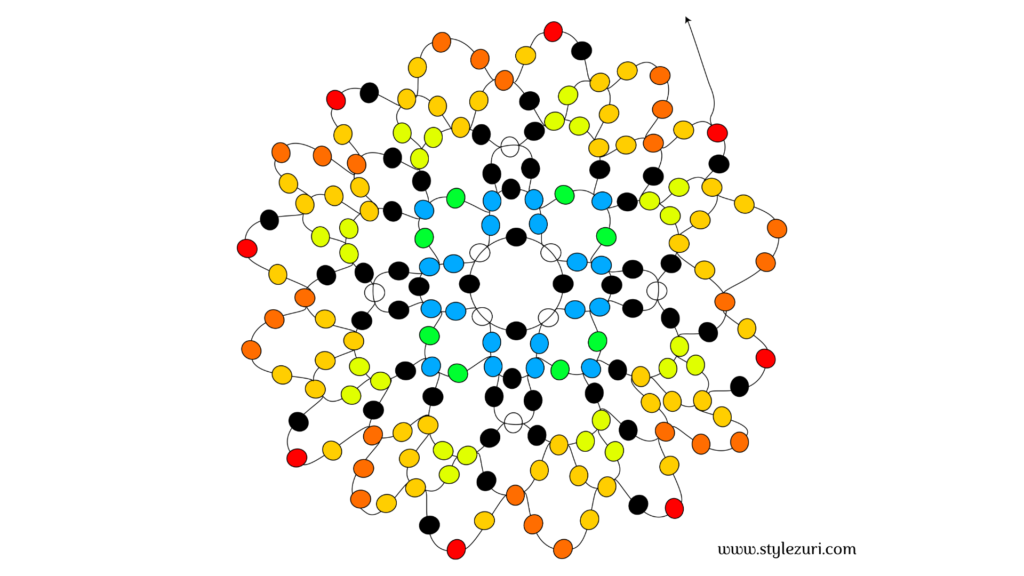
STEP 6
Start by picking 2 red beads and 1 orange bead.
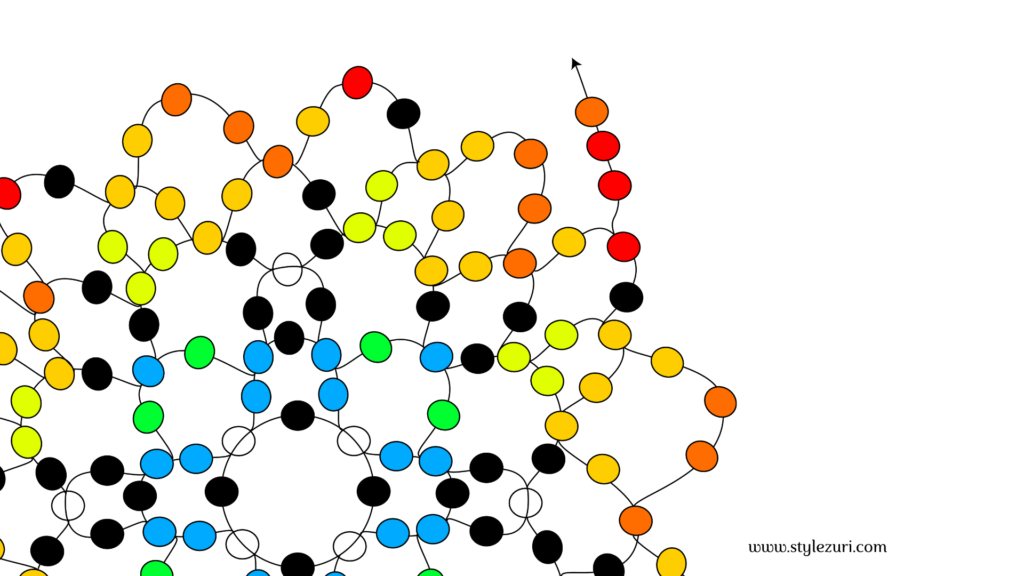
Pass the needle through the middle orange bead.
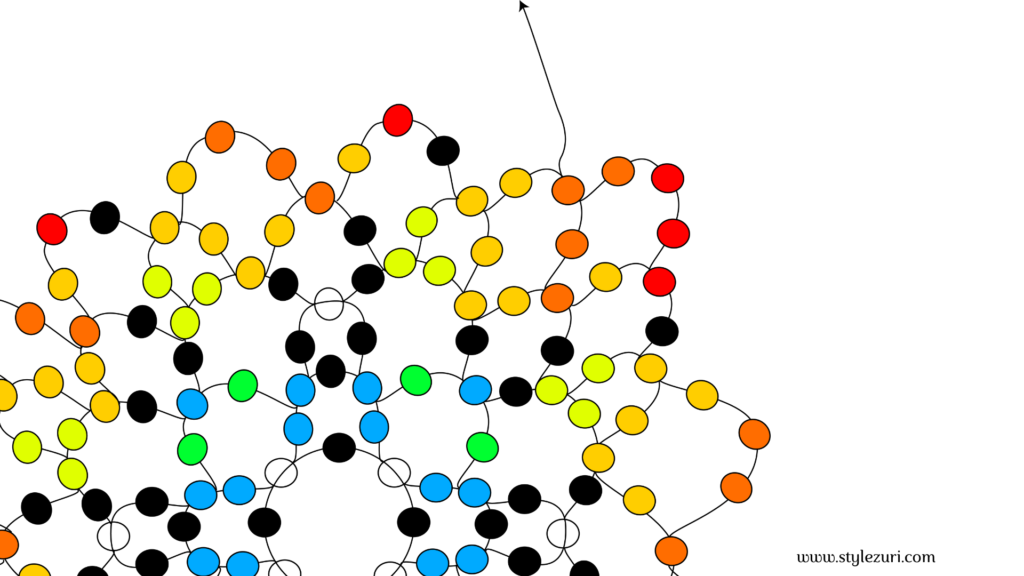
Now pick 1 black bead, 3 green beads and 1 black bead.
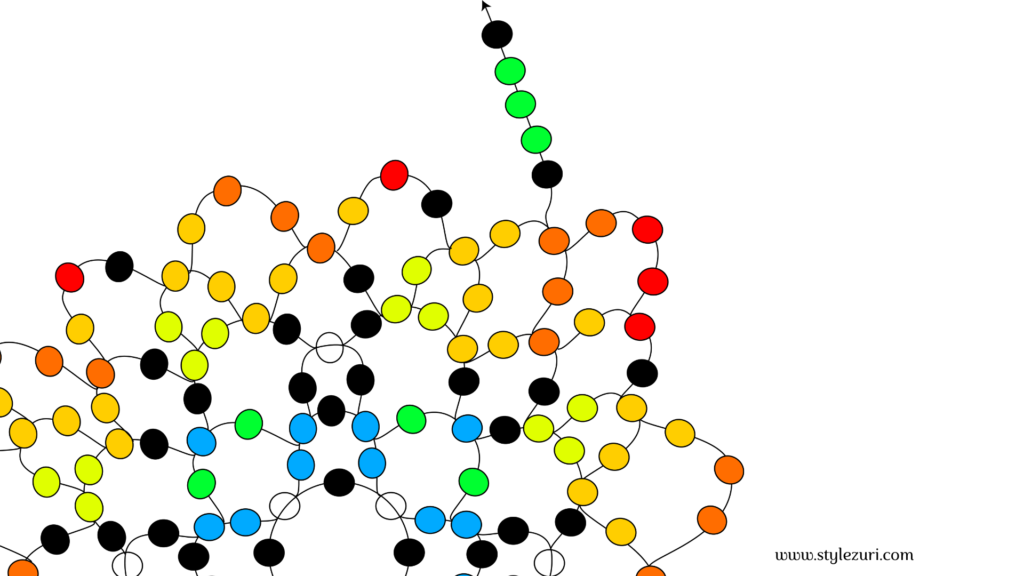
Pass the needle through the middle red bead.
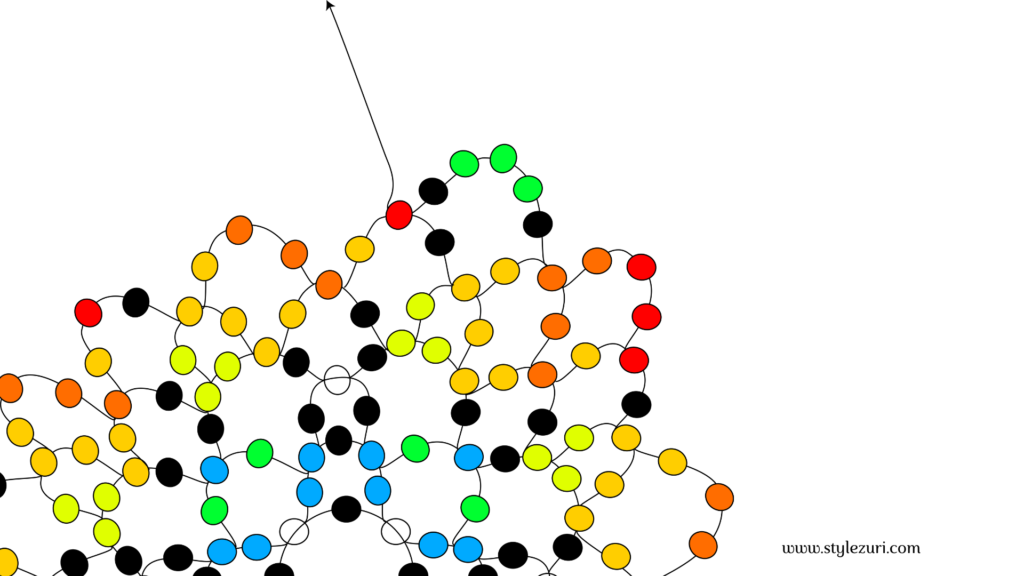
Now the pattern repeats from here, so keep going until you reach the end. When you get there, pass the needle through the two red beads so we can move on to the next step from there.
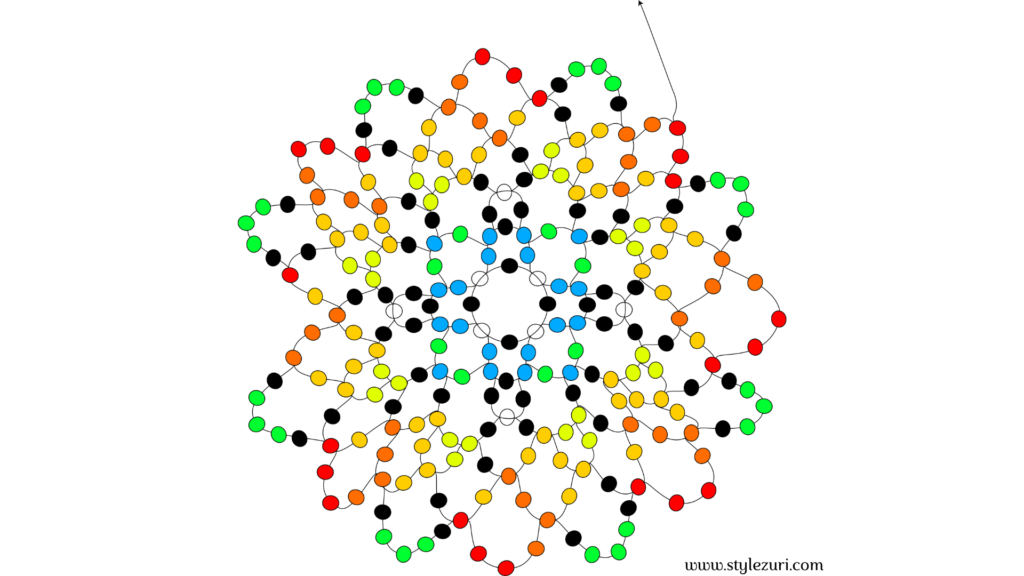
STEP 7
Start by picking 1 black bead, 1 blue bead and 1 black bead.
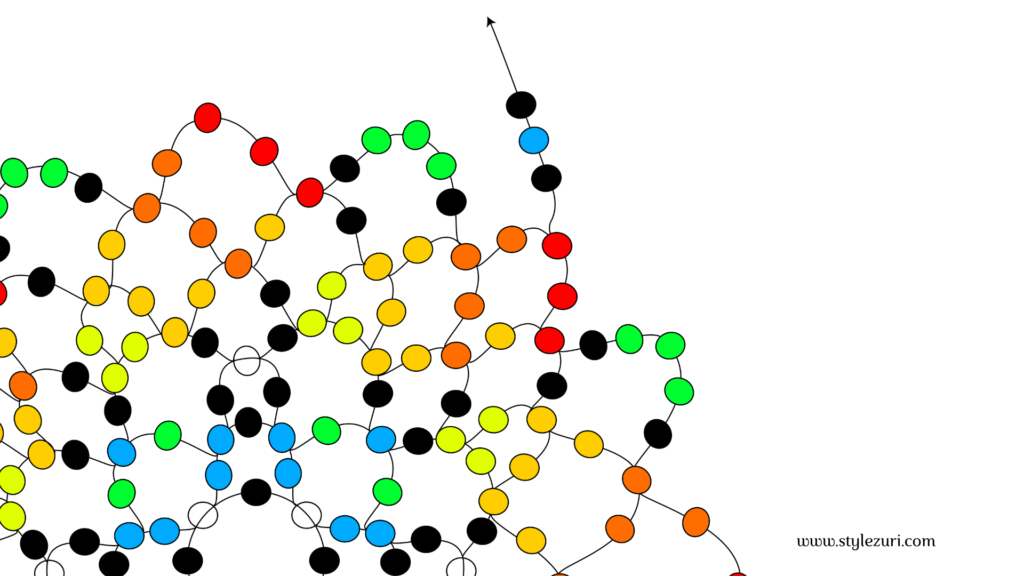
Now pass the needle through the second bead which happens to be the first green bead.
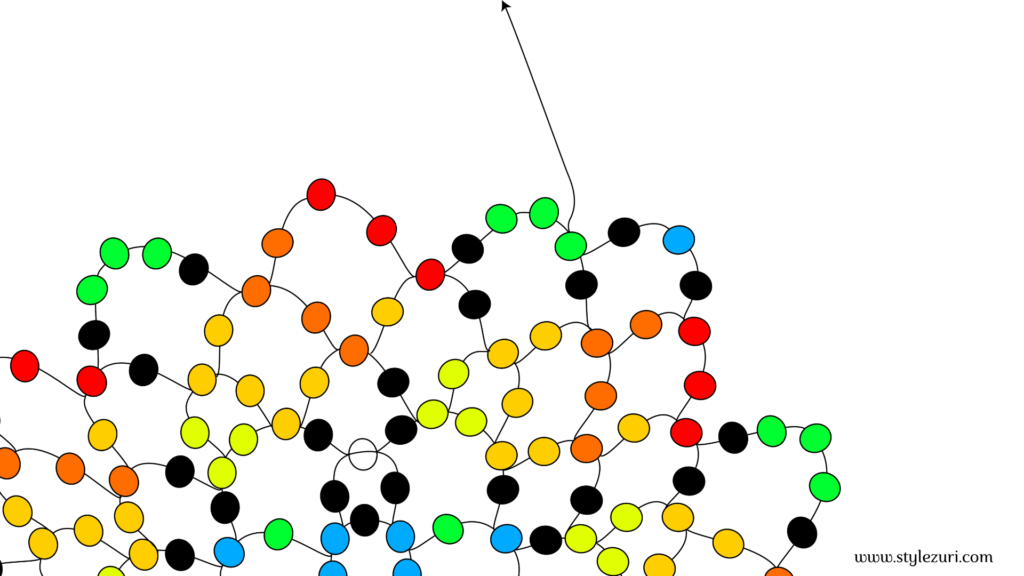
Pick 3 green beads.
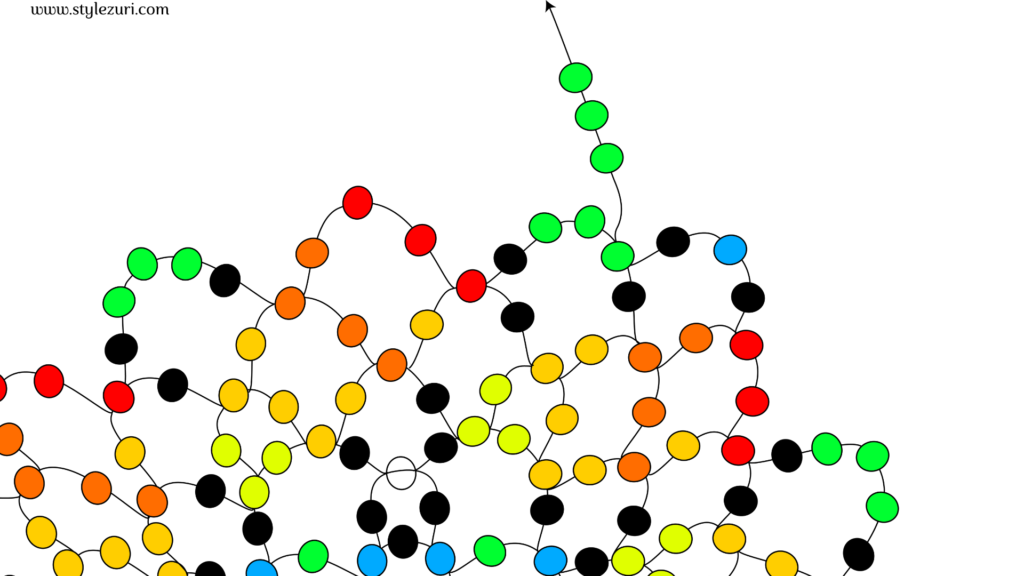
Skip one green bead and pass the needle through the next green bead.
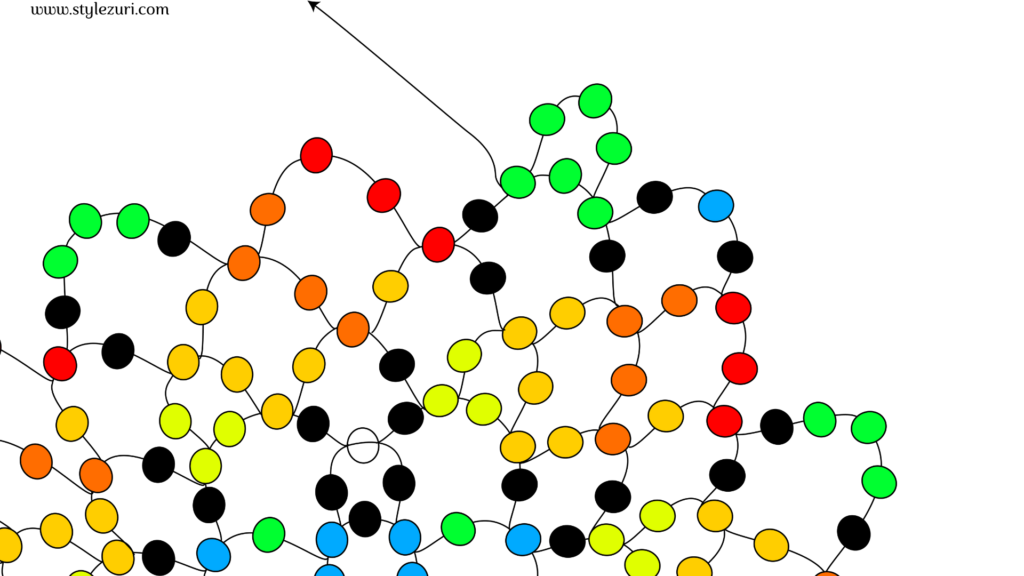
Pick 2 green beads and 1 black bead.
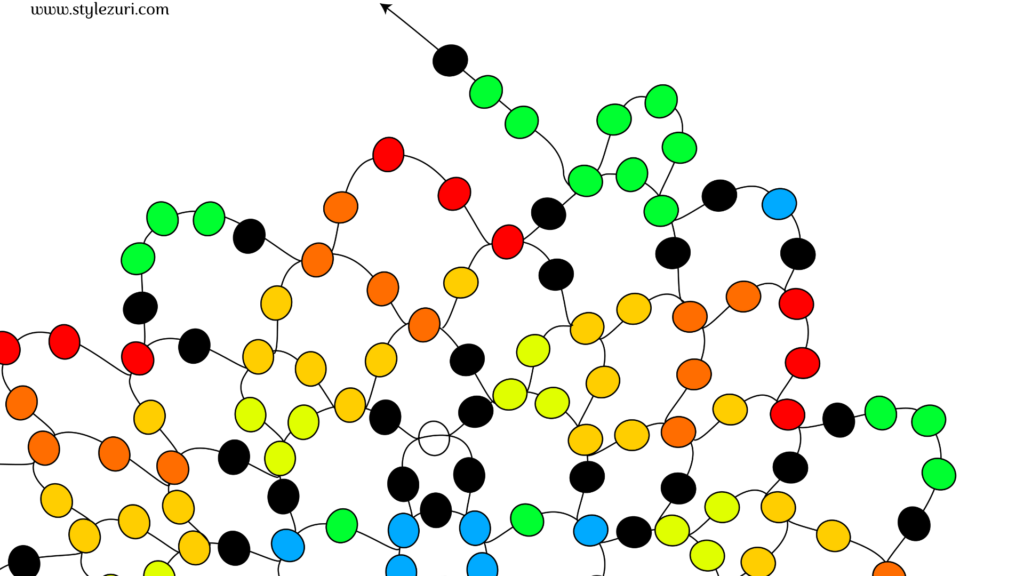
Pass the needle through the middle red bead.
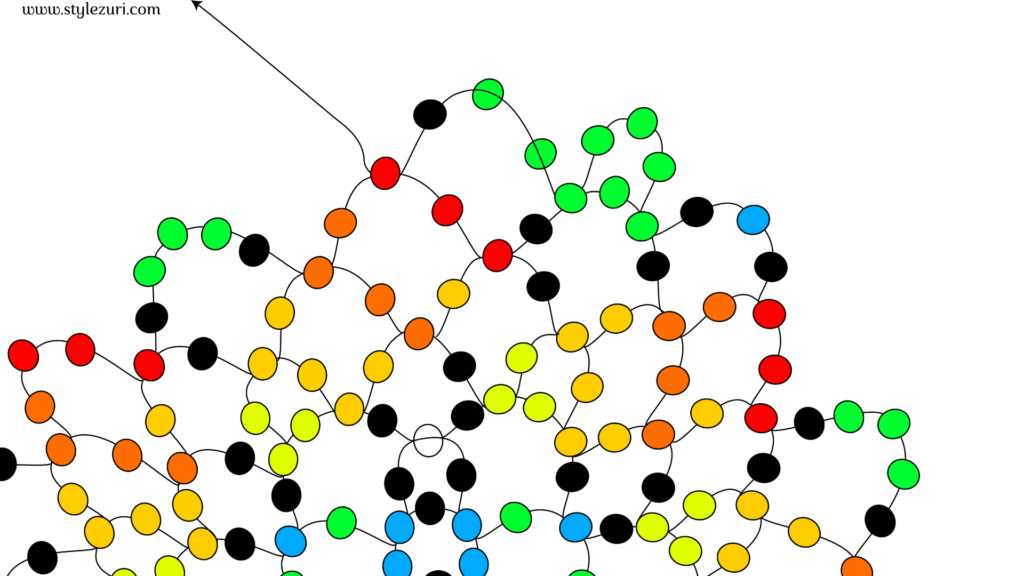
Now the pattern repeats itself, so just keep going until you reach the end. At the end, pass the needle through the black and blue bead so we can start our next step from there.
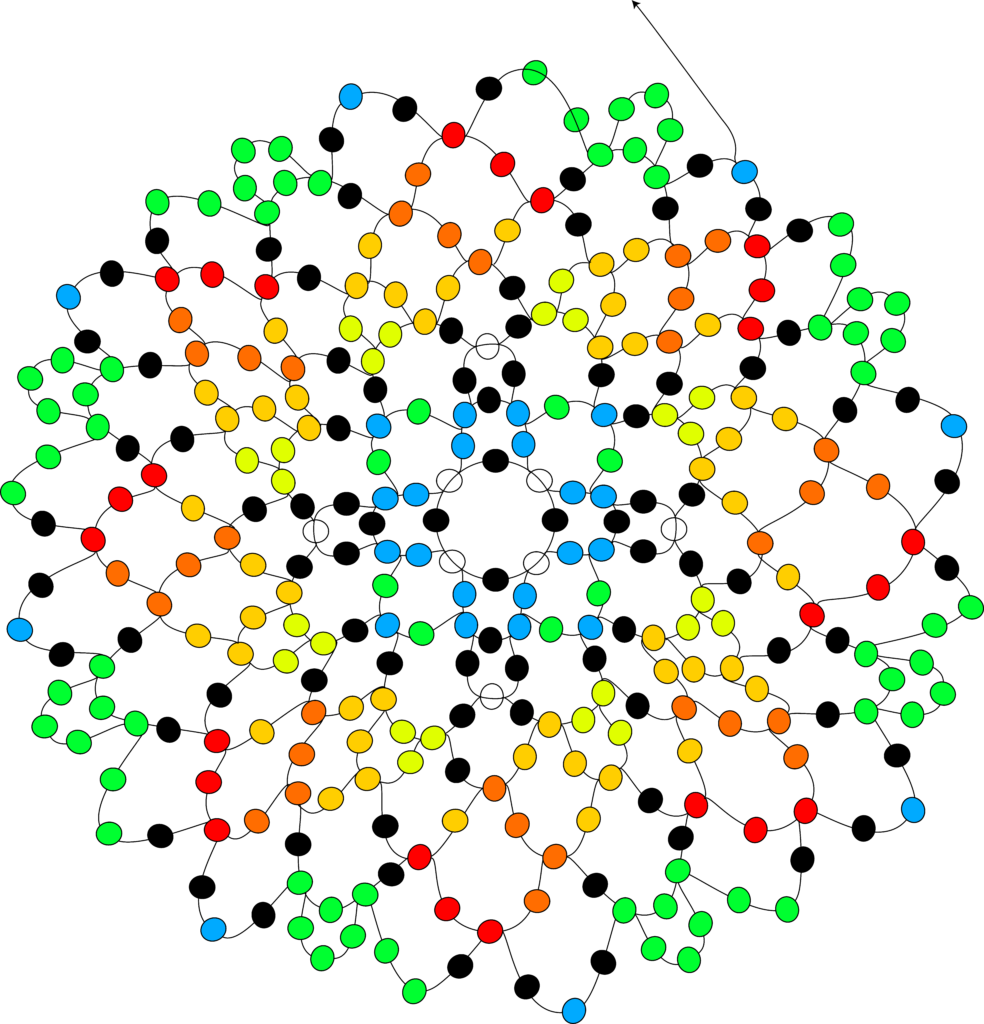
STEP 8
Start by picking 2 blue beads and 1 black bead.
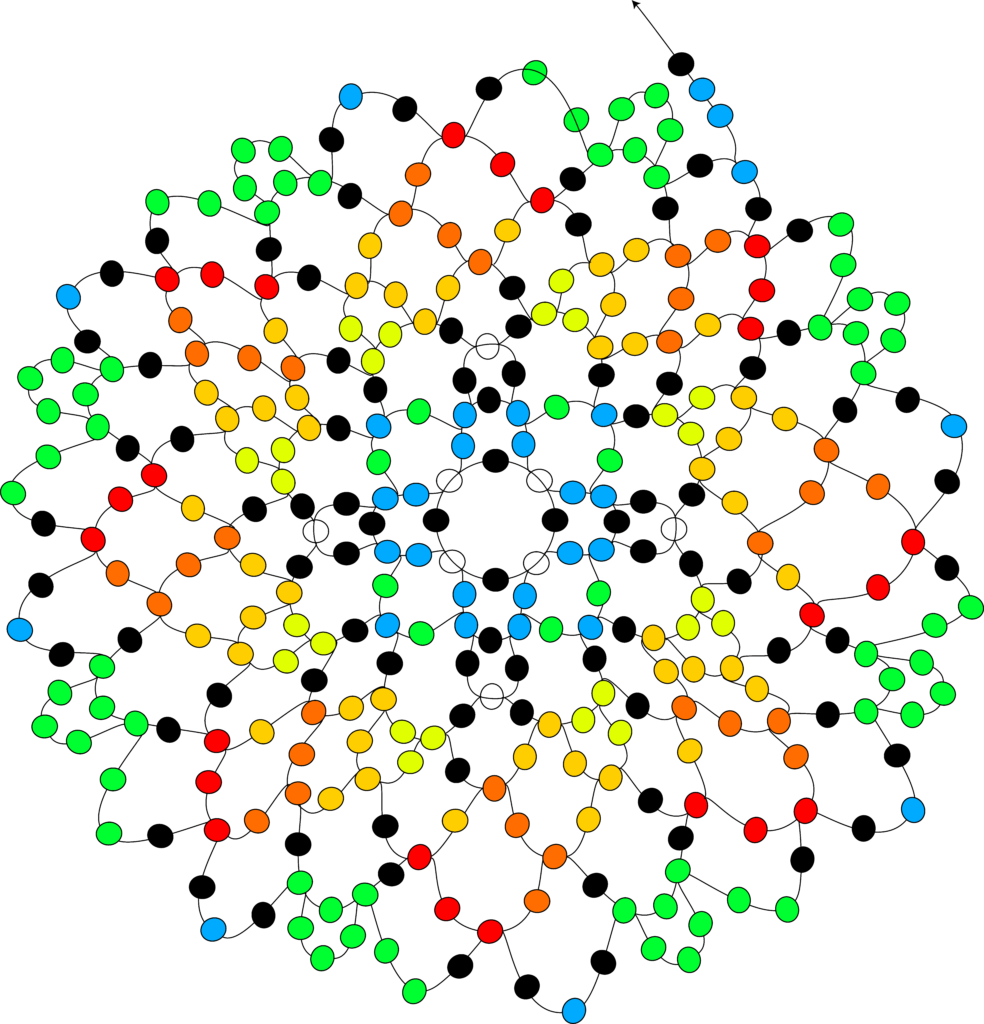
Pass the needle through the middle green bead.
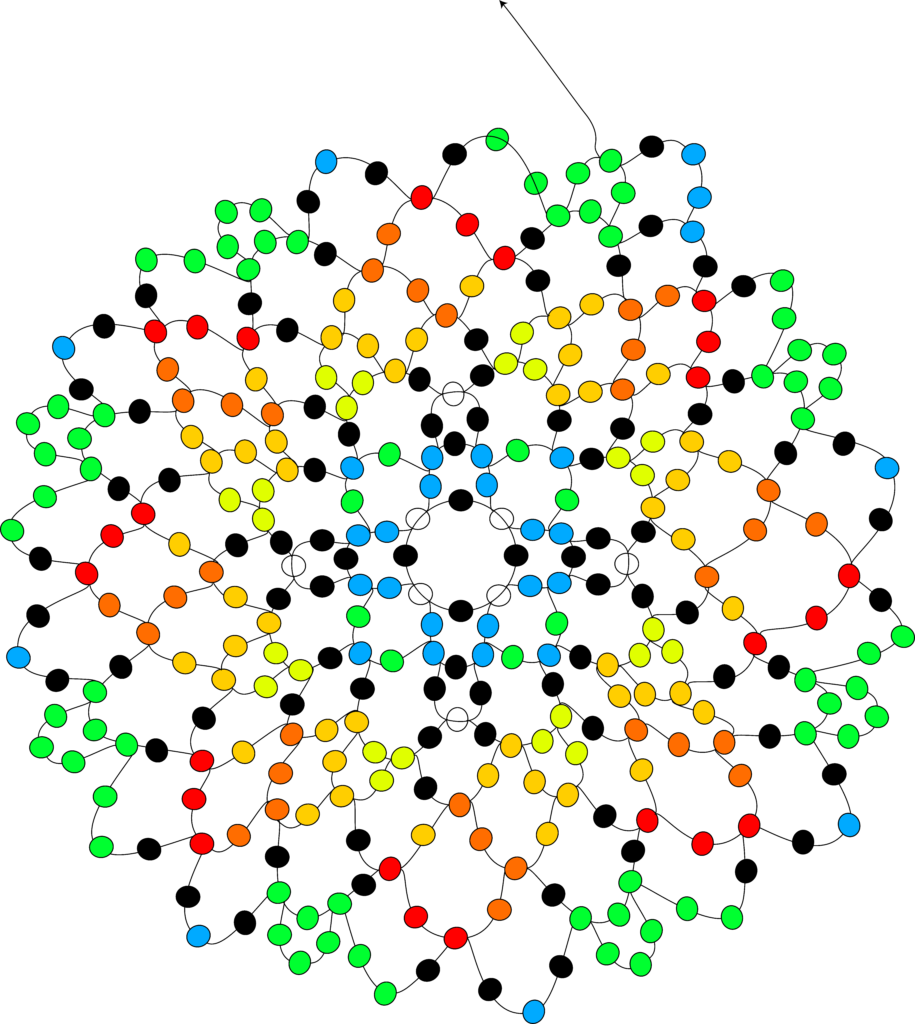
Pick 3 green beads.
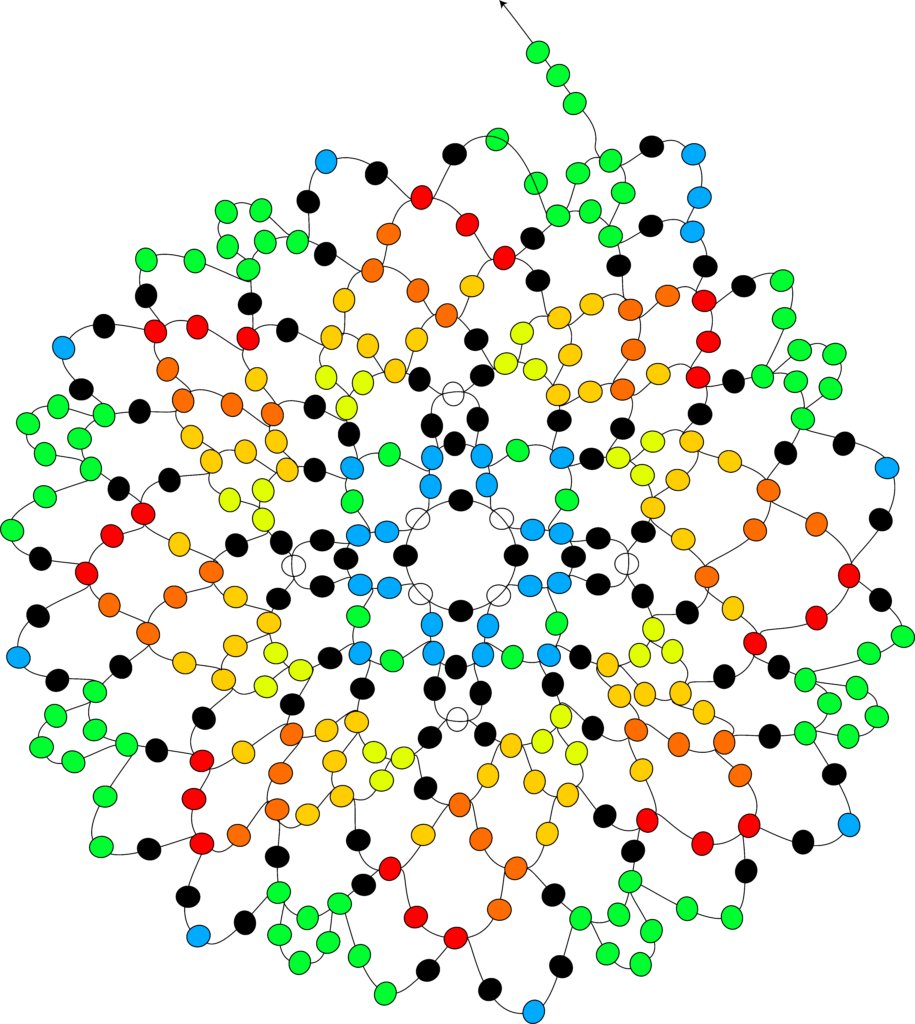
Pass the needle through the middle green bead.
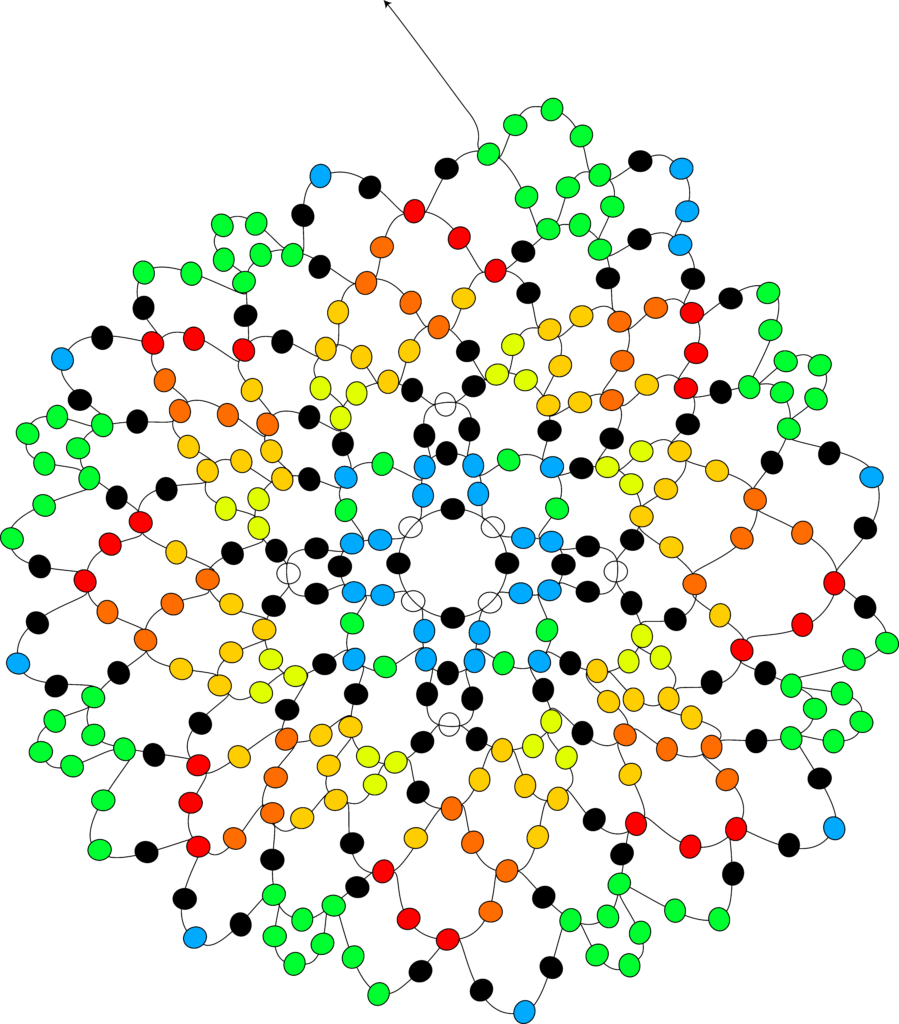
Pick 2 green beads and 1 black bead.
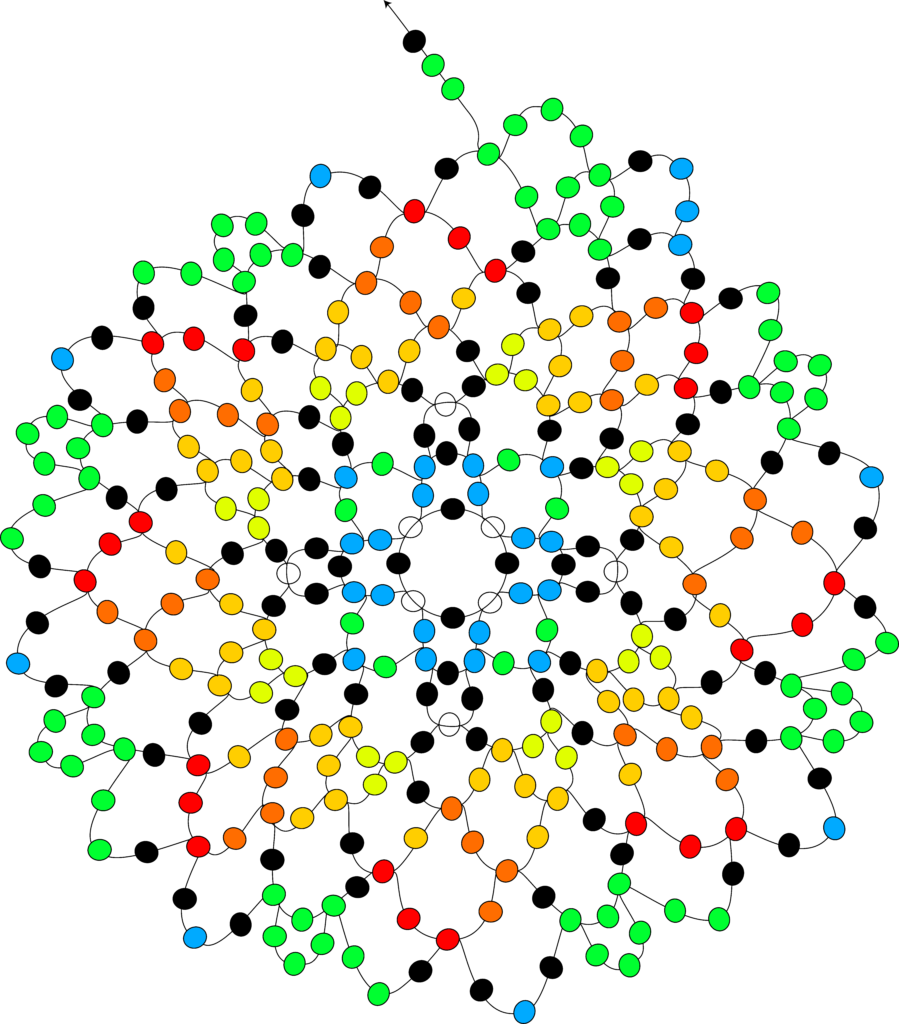
Pass the needle through the middle blue bead.
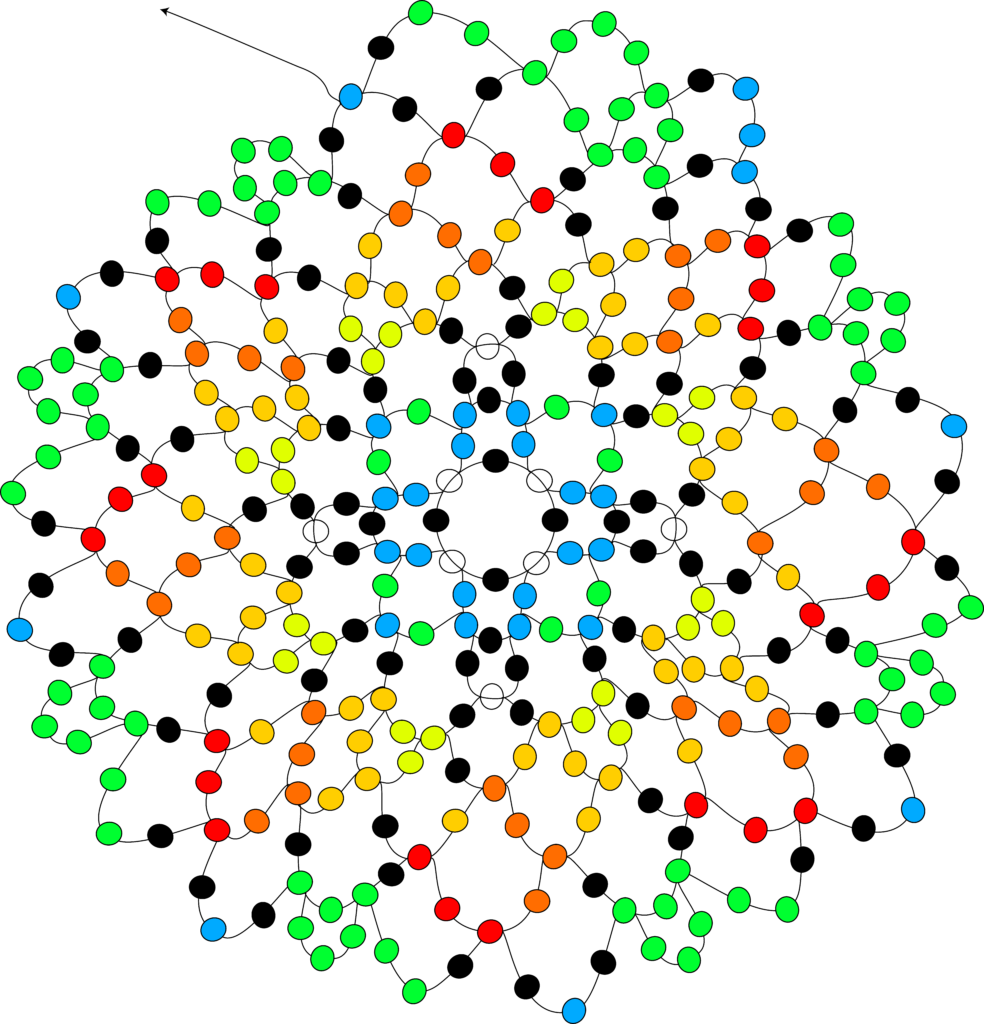
Now the pattern repeats itself, so keep going until you reach the end. When you get there, pass the needle through the 2 blue beads so we can start our next step from there.

STEP 9
Start by picking 1 black bead, 3 red beads and 1 black bead.
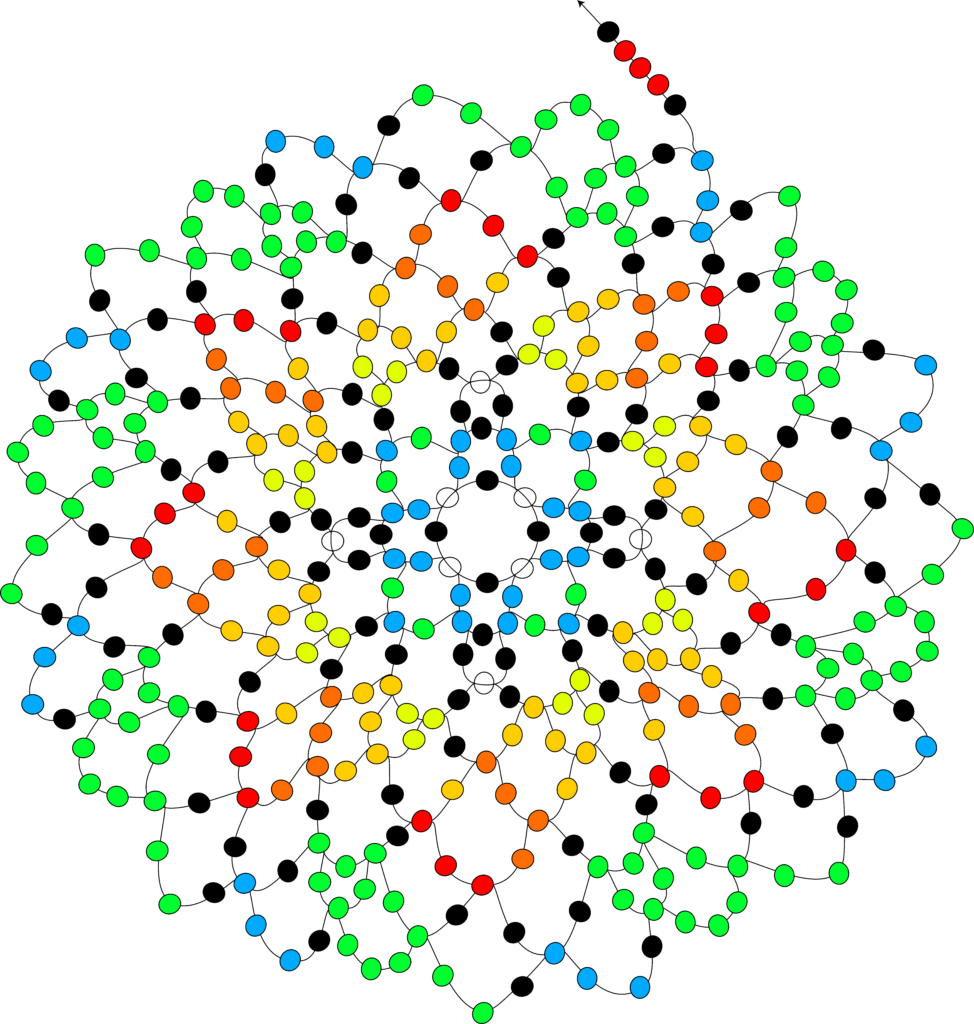
Pass the needle through the middle green bead.
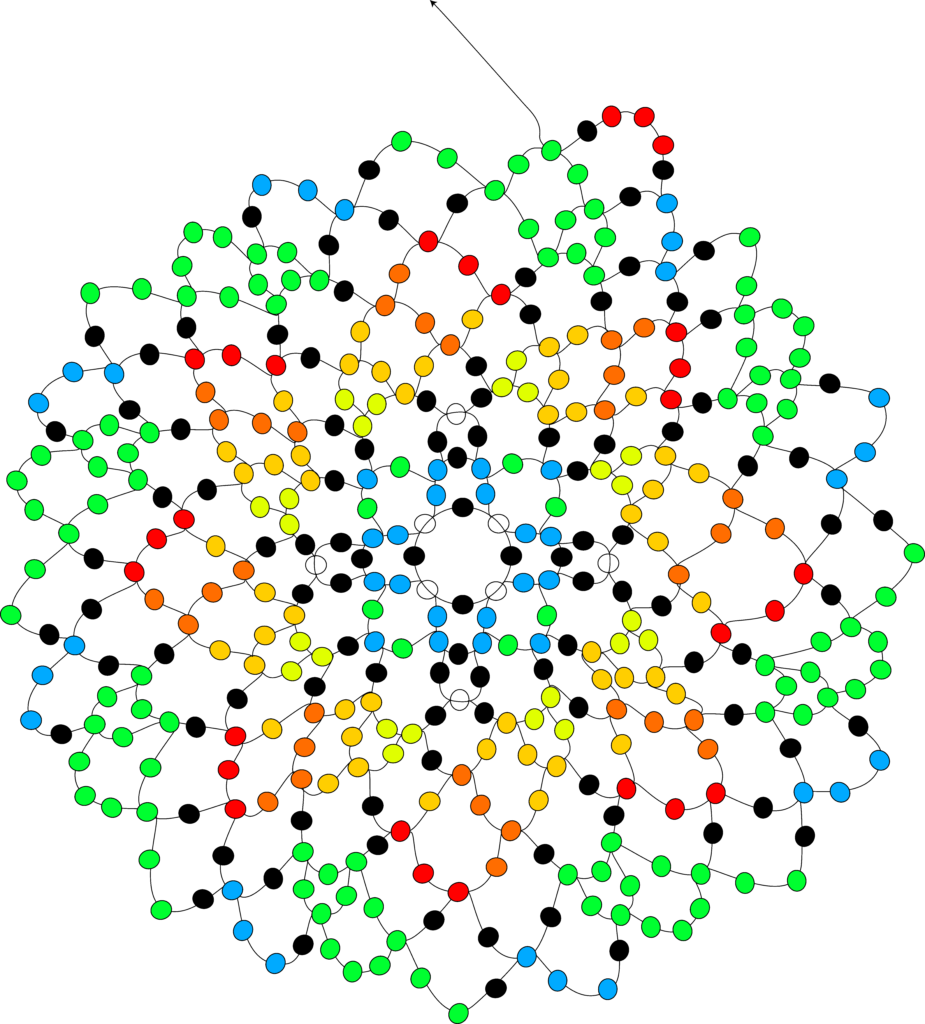
Pick 3 green beads.
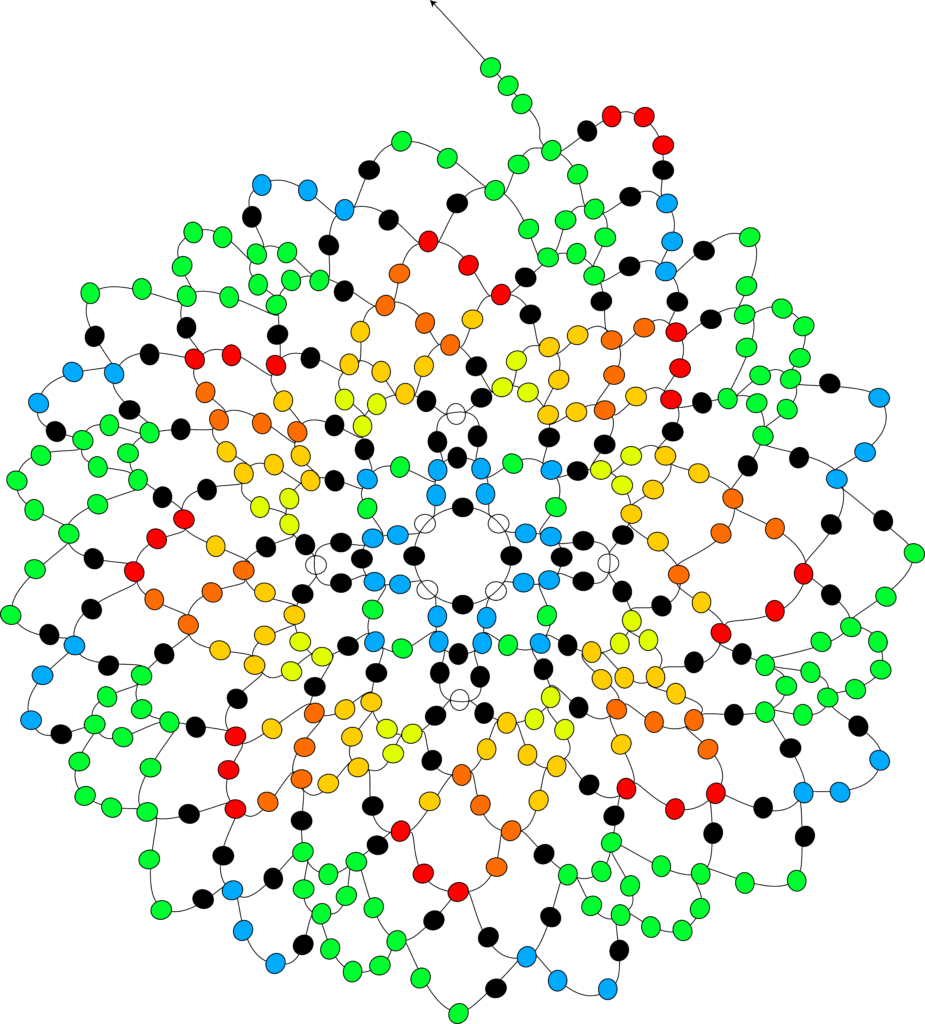
Pass the needle through the middle green bead.
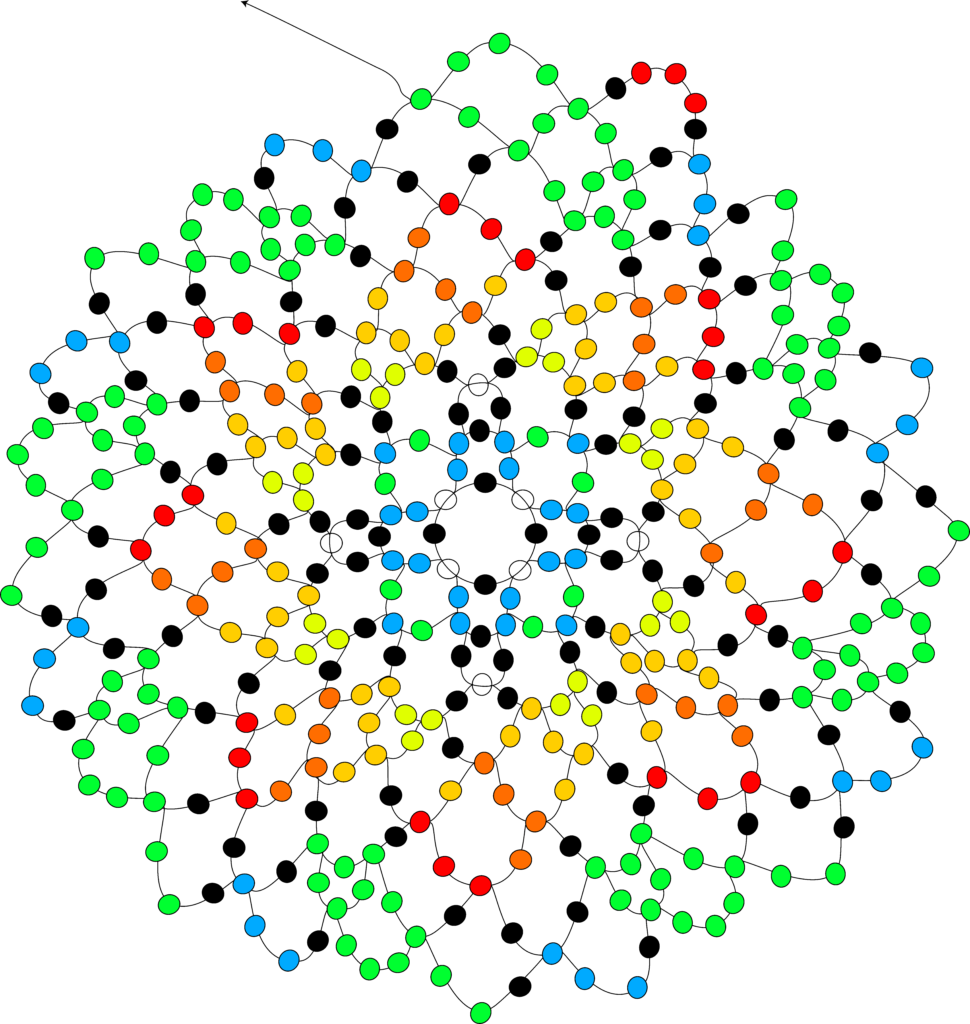
Pick 2 green beads and 1 black bead.
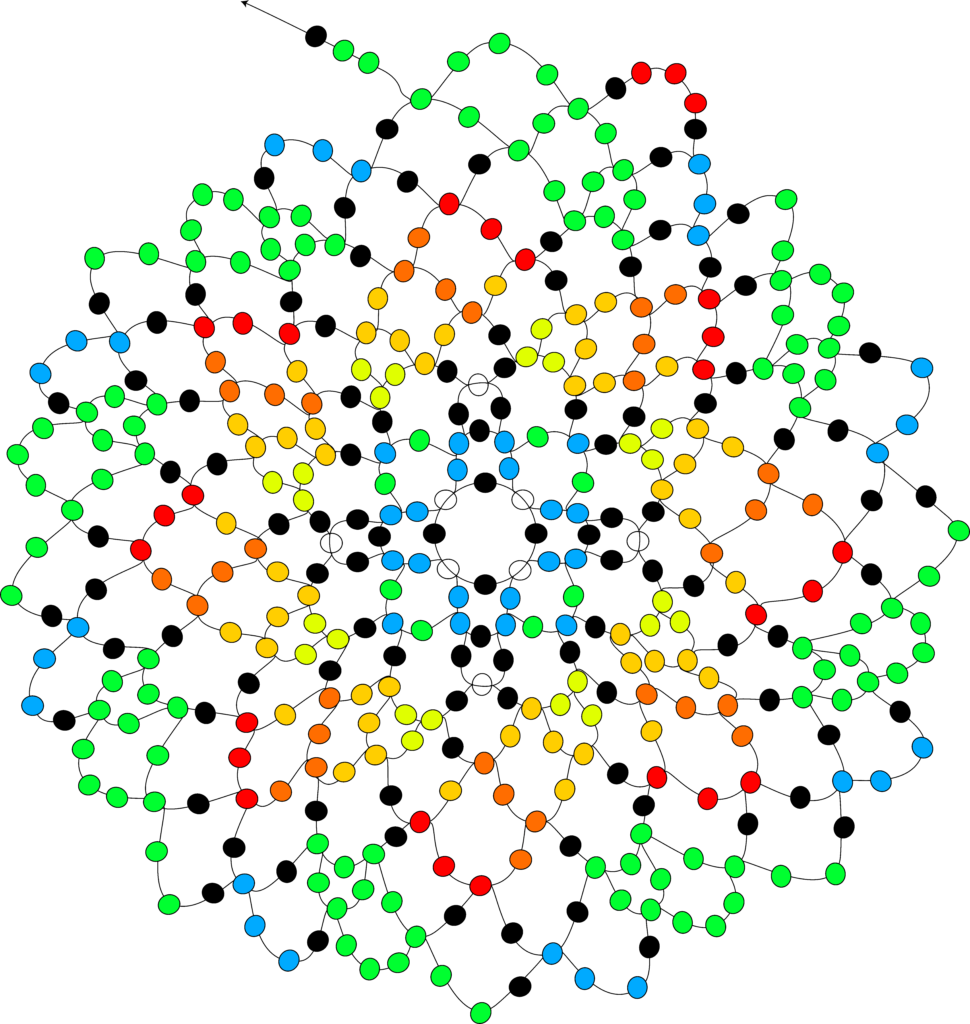
Pass the needle through the middle blue bead.
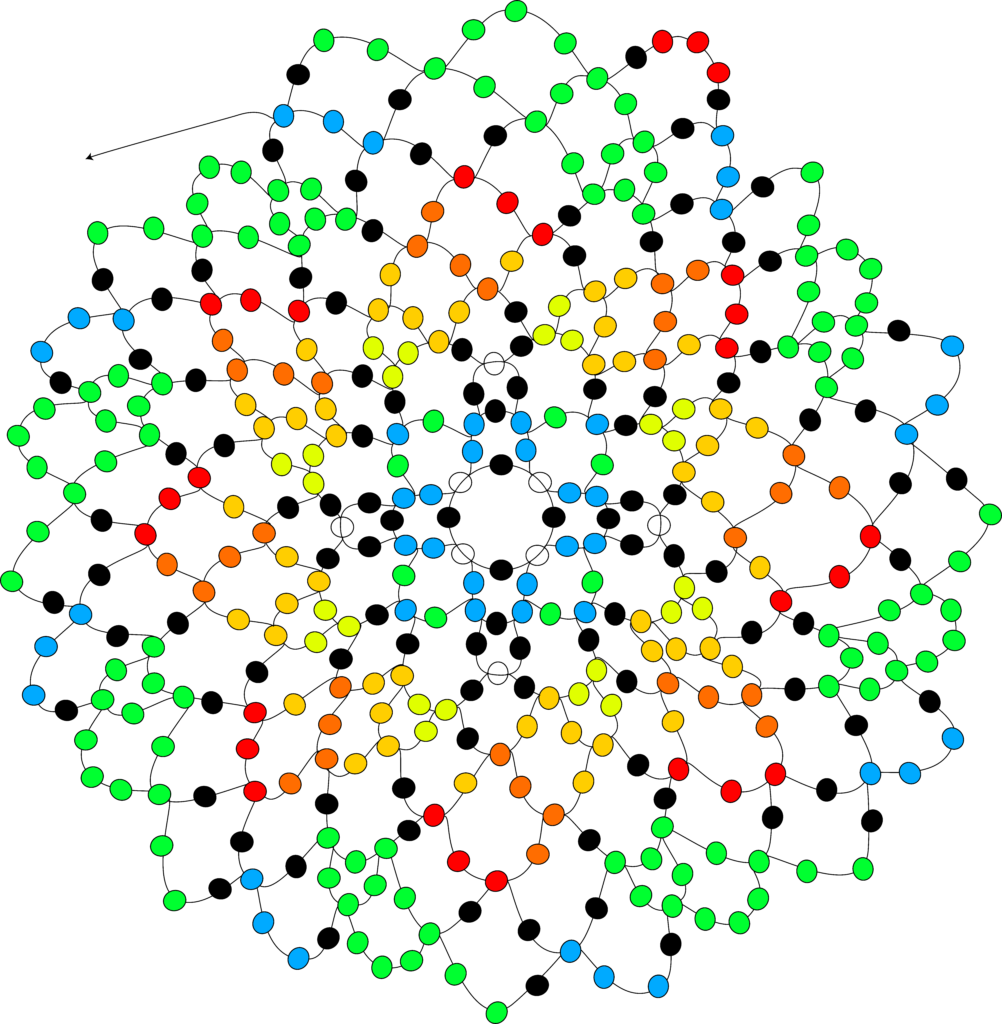
Now the pattern repeats itself from here, so keep going until you reach the end. When you get there, pass the needle through the black and red bead so we can start our final step from there.
STEP 10
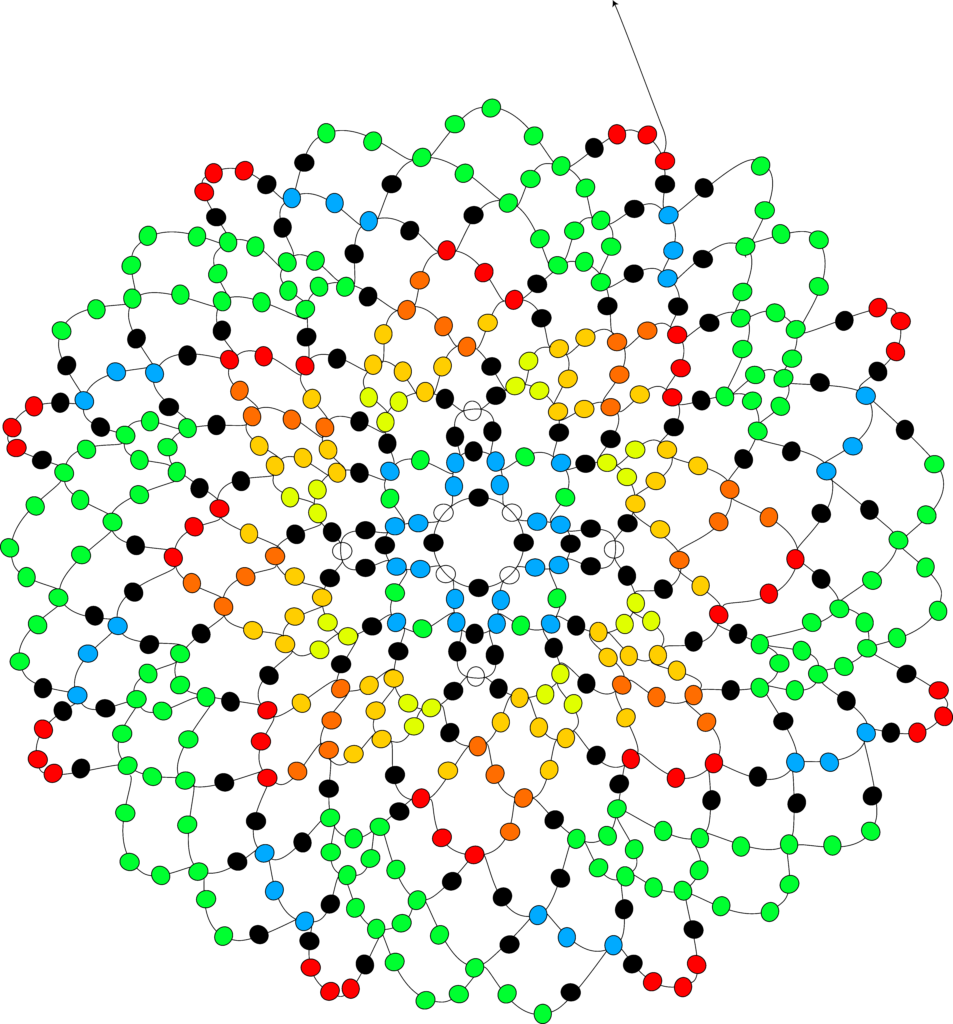
So this is the final step! if you’ve made it this far, give yourself a pat on the back! Start by picking up 3 black beads. You’re almost there!
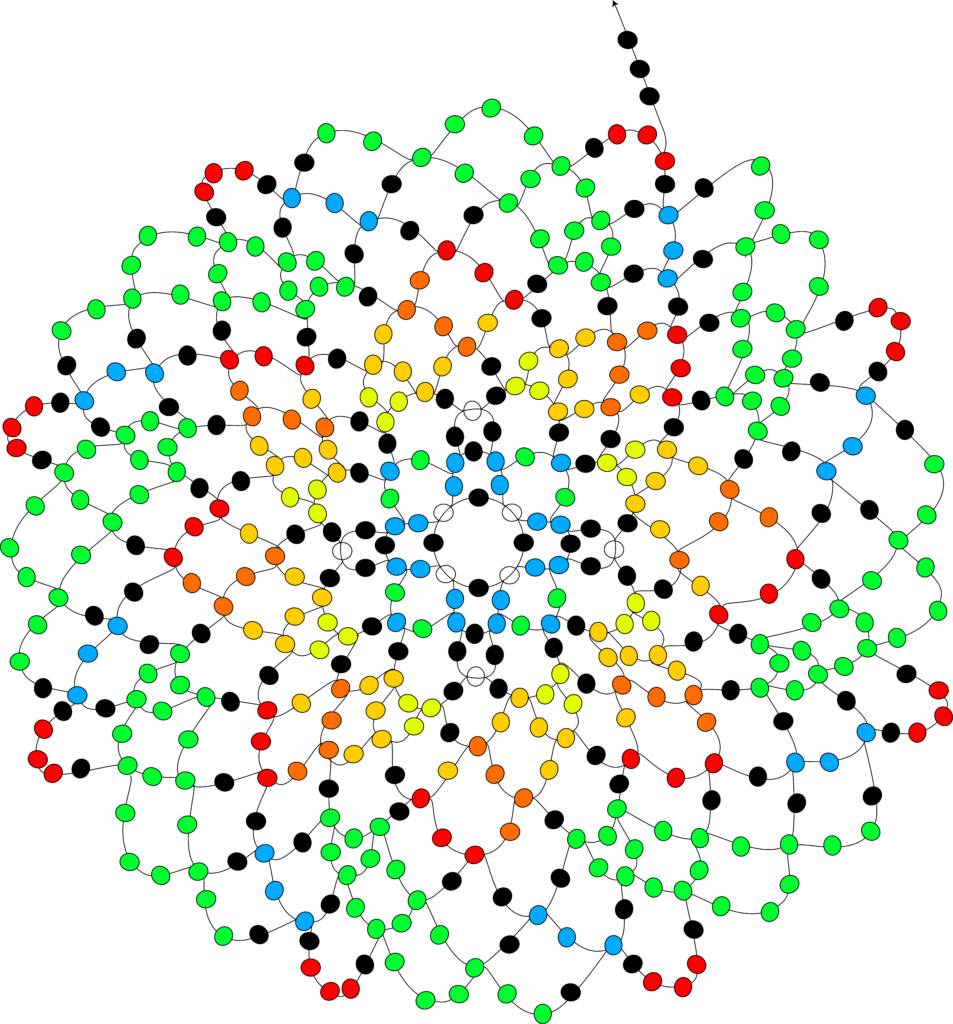
Skip one red bead and pass the needle through the next red bead.
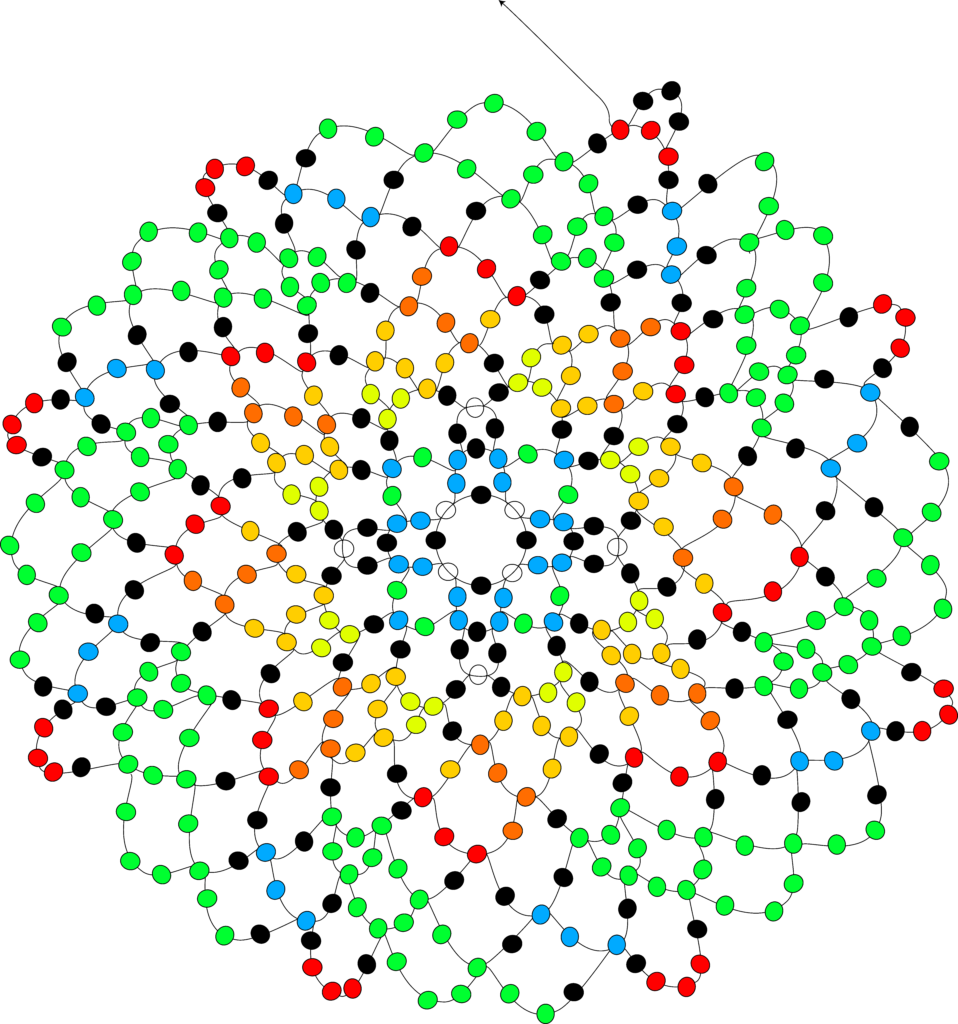
Now pick 2 black beads.
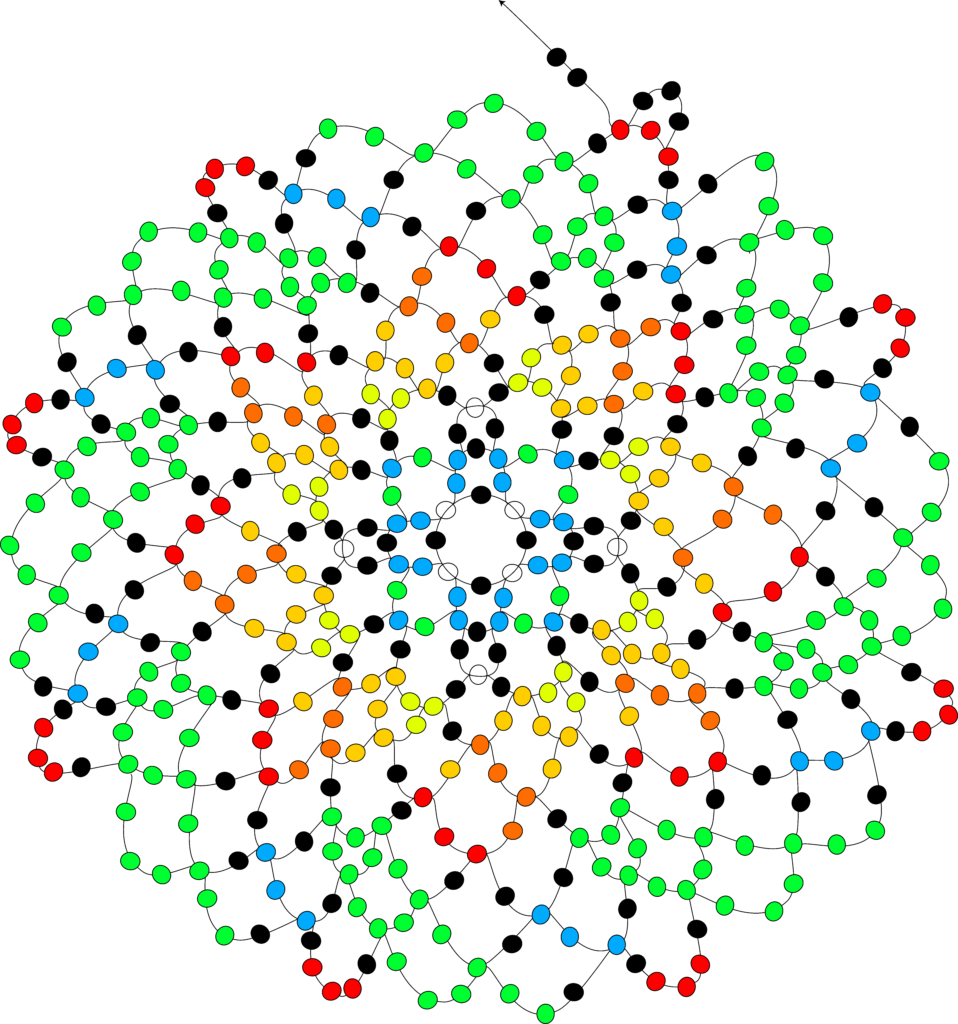
Pass the needle through the middle green bead.
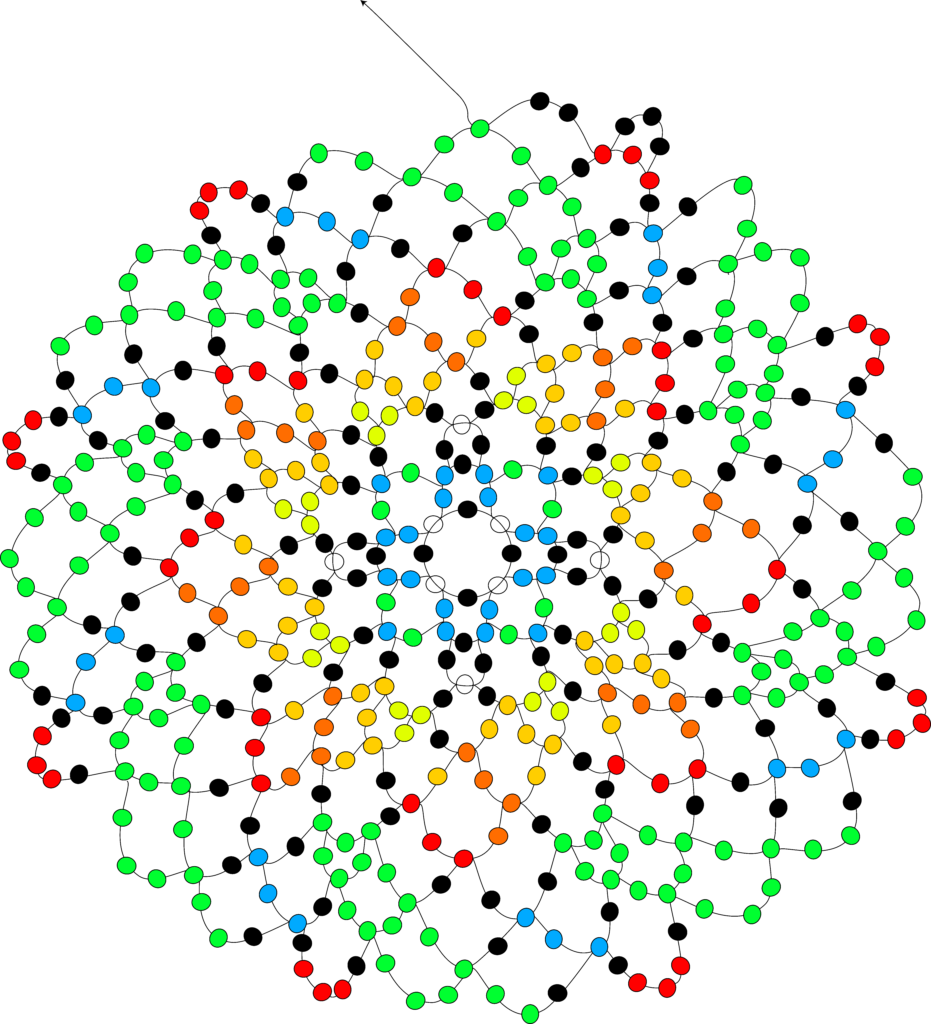
Pick 2 black beads.
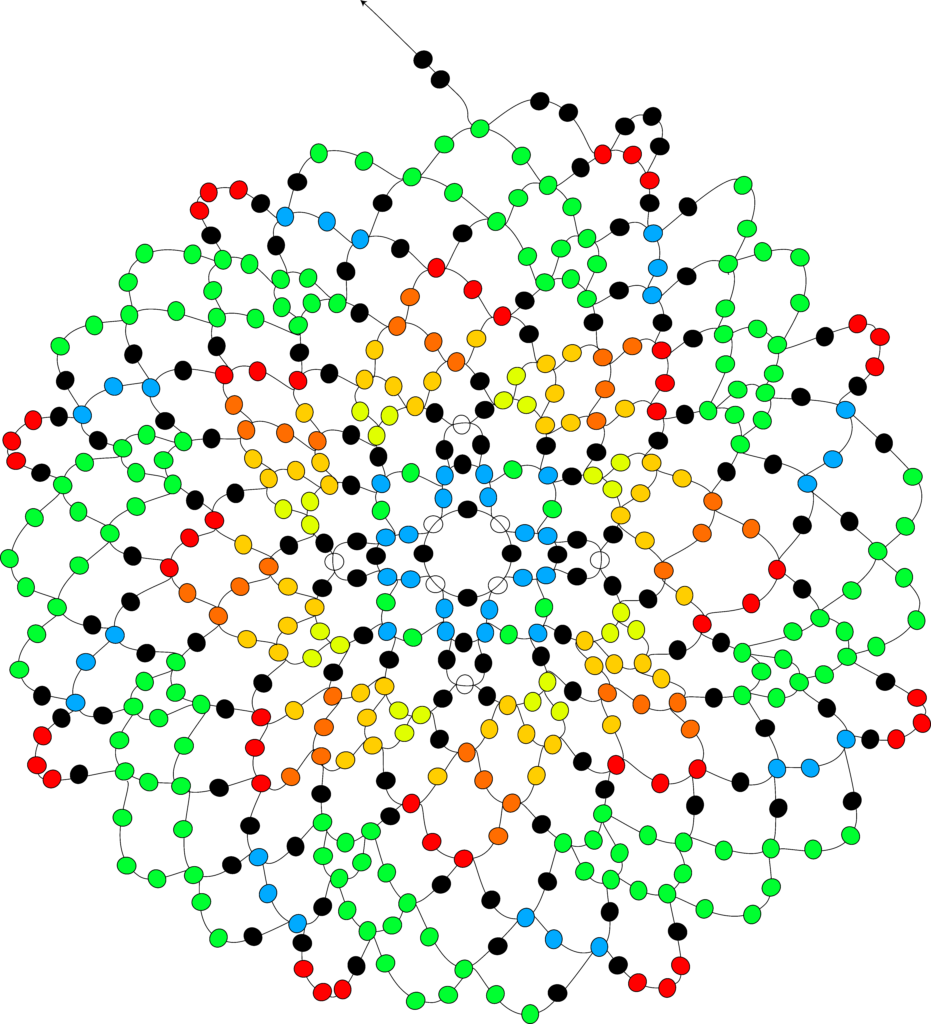
Pass the needle through the middle green bead.
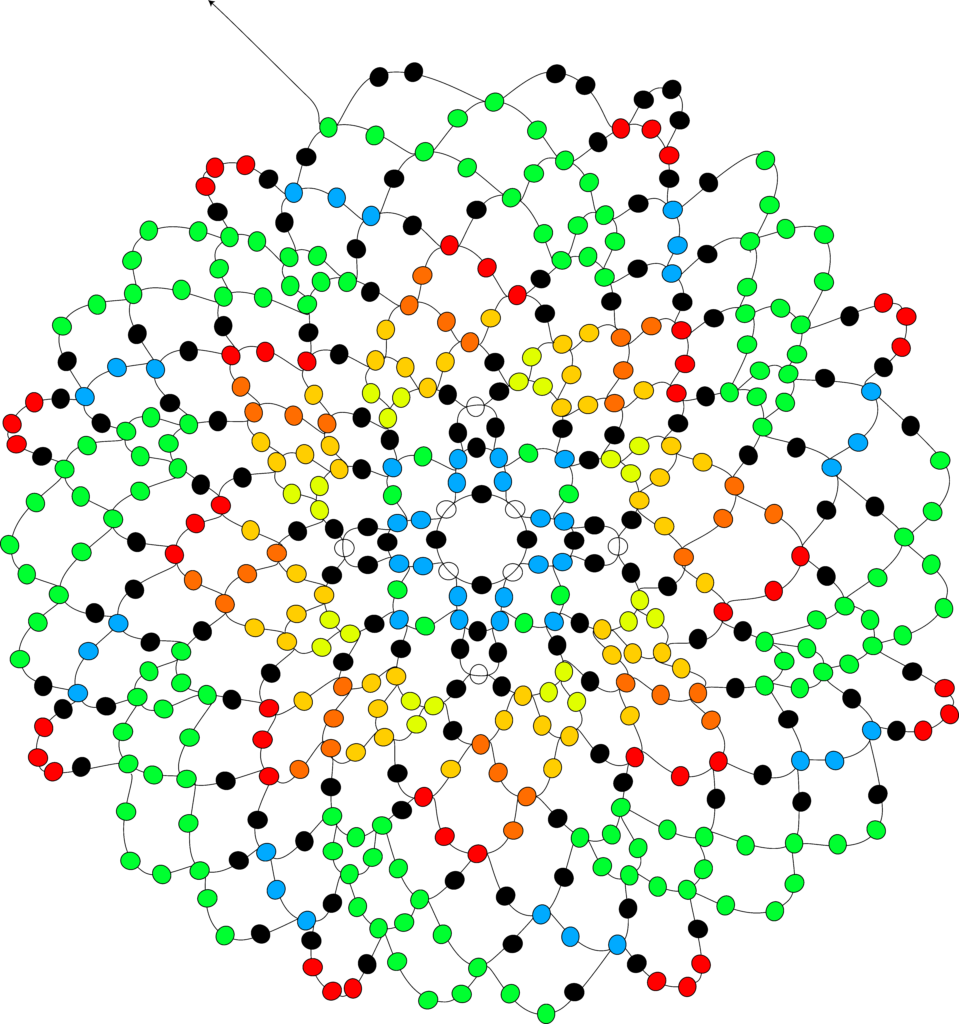
Now pick 2 black beads.
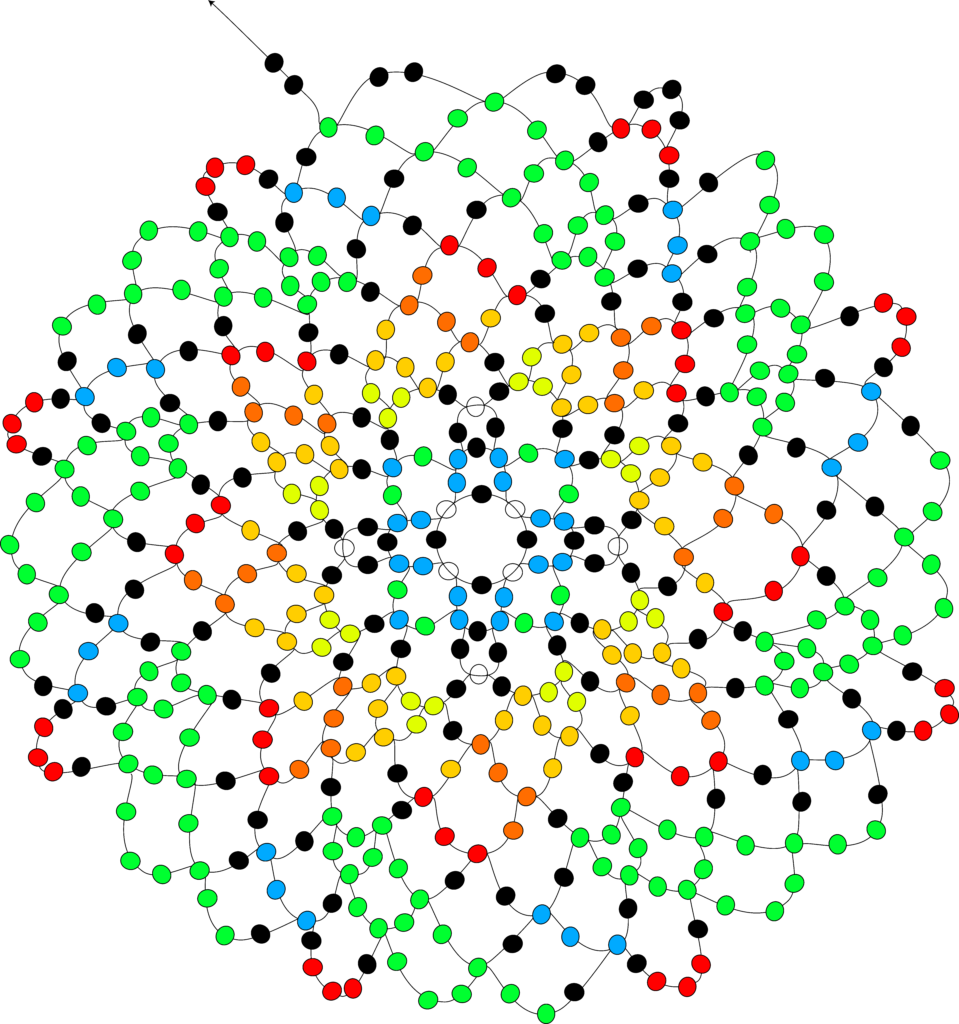
Now pass the needle through the second bead, which is the first red bead. The pattern will repeat itself from here, so just keep going, and you’ll be done—this was our last step!
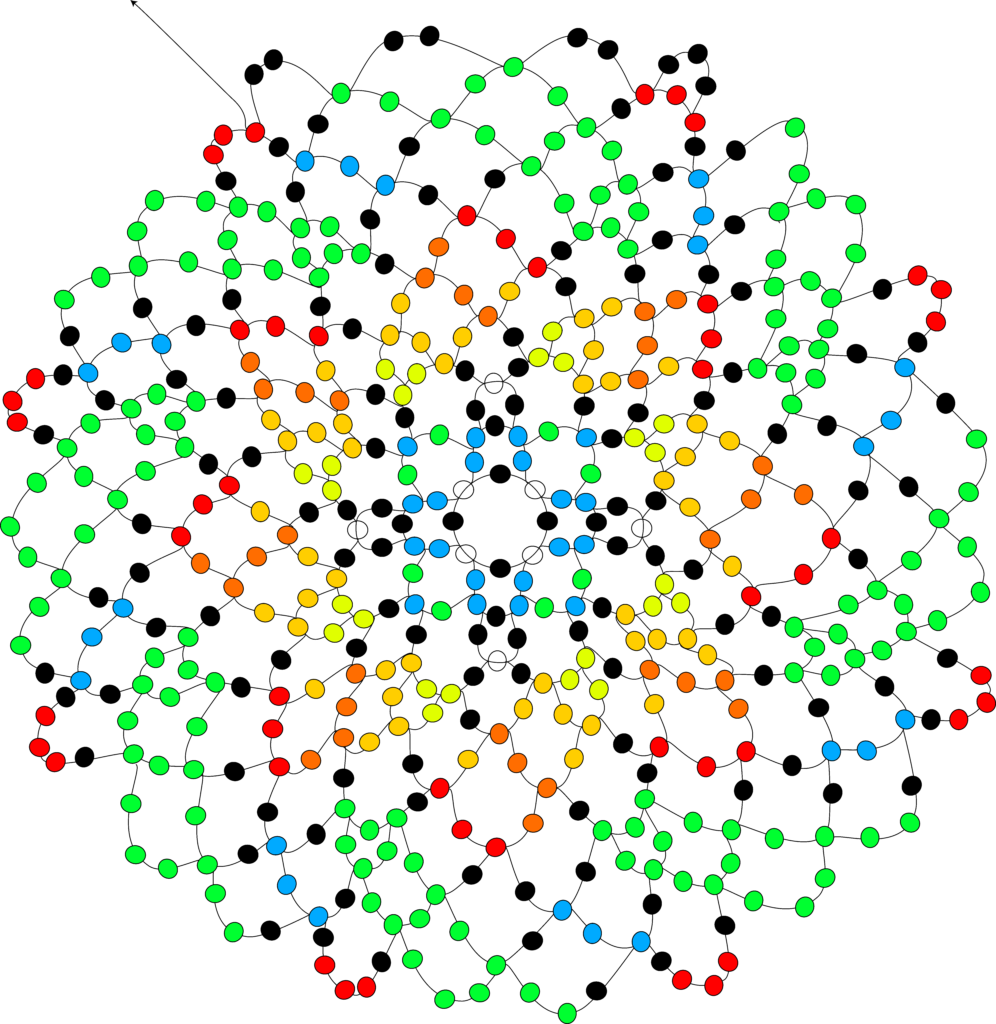
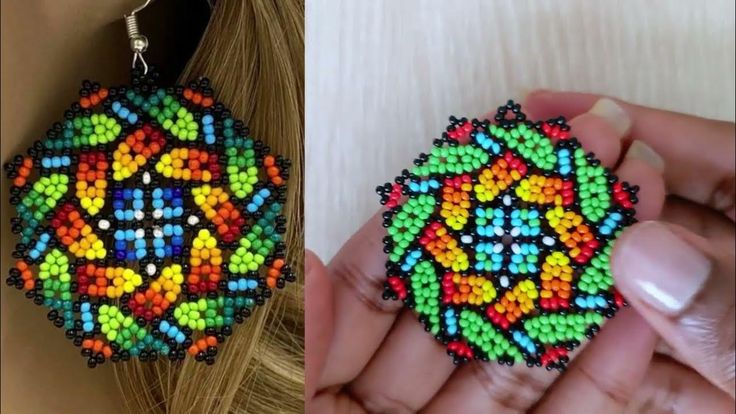
And that’s a wrap! Look at how stunning the pattern turned out. You can rock these as earrings or use them as pendants for necklaces. Just remember, the size of the beads will determine the size of your finished piece. I’m thrilled you stayed with me through the process—there’s more exciting stuff on the way! Feel free to leave a comment if you have any questions or just want to say hi.

